Renovating a bathroom on a budget starts with smart priorities and practical choices. You’ll maximize impact by quick updates—fixtures, lighting, caulk, grout—paired with durable, affordable materials like vinyl or peel-and-stick finishes. Plan in three budget stages, decide what you can DIY, and know when to bring in help. Track costs, keep a contingency fund, and stay focused on storage and finishes that look high-end without breaking the bank. So, where will you start first?
Know Your Typical Bathroom Reno Costs

Understanding typical bathroom renovation costs helps you budget effectively. You’ll start by categorizing expenses into fixtures, materials, labor, and contingencies.
Expect the main cost drivers to be replacing the vanity, shower, flooring, and toilet, plus plumbing and electrical adjustments.
Budget with realistic ranges: mid-range updates can run in the low to mid five figures, while upscale changes climb toward six figures.
Shop smart by comparing brands, requesting itemized bids, and timing projects to off-peak seasons.
Include costs for permits, disposal, and small upgrades like lighting and ventilation.
Consider Luxury accessories to elevate the feel without breaking the bank, and Eco friendly options that save long-term energy and water.
Track costs against a written plan to avoid surprises and stay on target.
Prioritize Updates That Deliver the Biggest Impact
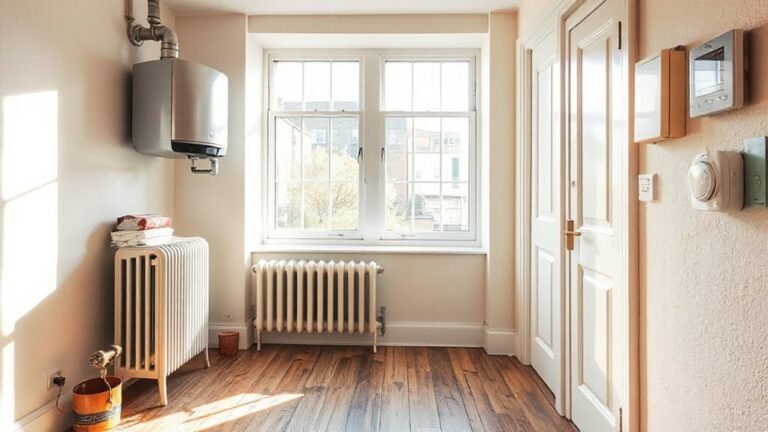
When you’ve mapped out costs, zero in on updates that yield the biggest payoff for your space and budget. Start with what you’ll actually notice daily: bathroom lighting and ventilation improvements. Good lighting makes tasks easier and rooms feel larger, so prioritize durable fixtures and layered sources (ambient, task, and accent).
If moisture is an issue, upgrade to a reliable ventilation fan and ensure proper ducting to reduce mold risk.
Tackle cosmetic updates that don’t demand a full demolition when possible, like reglazing a tub, replacing mismatched hardware, or rejuvenating caulk and grout. Choose fixtures with universal appeal and energy efficiency to stretch savings.
Plan updates in function-first order, then schedule aesthetic tweaks second, avoiding overinvestment in fleeting trends.
Set Your Budget in 3 Easy Stages
Set a realistic budget ceiling and stick to it, so you don’t overspend on vanity details.
Start by listing must-haves first, then allocate funds to each item in order of importance.
Always plan a contingency fund for unexpected costs to keep your project on track.
Set Realistic Limits
To start, set a clear ceiling for your bathroom remodel by dividing your total budget into three realistic stages: must-haves, nice-to-haves, and backups. You’ll protect your finances by choosing essentials first, then evaluating extras against value.
Establish a concrete budget planning framework: assign caps to fixtures, fixtures’ install costs, and labor. Track every expense and revise as needed to avoid surprises.
Keep your renovation timeline realistic by sequencing trades, allowing buffer days for delays, and communicating changes promptly. Don’t chase perfection on day one; aim for durable basics that deliver function and feel.
Revisit limits weekly, trimming nonessential items if costs creep. With disciplined pacing, you maintain control, reduce debt, and finish on schedule while still achieving meaningful upgrades.
Prioritize Must-Haves First
You’ve mapped out the budget stages; now focus on what must be done first. Identify absolute essentials: fixtures, finishes, and plumbing you can’t live without. Prioritize items that unlock function, safety, and basic comfort over trendier upgrades.
Set a strict cap on discretionary purchases and hold fast until core needs are secured. For each must-have, compare durability, cost, and install ease to avoid later retrofits.
Choose budget-friendly decor that delivers impact with minimal expense, like solid-color tiles or simple hardware, and avoid high-maintenance surfaces that spike upkeep.
When possible, opt for sustainable materials that withstand moisture and wear without skyrocketing price.
Protect your plan with written criteria, then execute in tight, sequential steps to stay on track.
Plan for Contingencies Budget
Have a contingency budget ready so surprises don’t derail your project. Plan for contingencies by allocating a dedicated fund separate from your main renovation pot. Use contingency planning to cover unforeseen issues, delays, or scope changes without stopping progress.
A common target is 10–20% of your total budget, adjusted to project size and risk factors. Identify likely risks early—plumbing quirks, hidden rot, or permit delays—and assign dollar amounts accordingly.
Track expenses weekly and reallocate as needed, rather than dipping into essential items. Prioritize transparency with contractors about contingencies so everyone works with the same expectations.
Document variances and adjust future estimates to reduce surprises. This approach keeps your bathroom renovation on track, within scope, and financially stable, even when the unexpected arises.
Budget-Friendly Materials That Look High-End
Budget-friendly materials can look premium when you choose solid finishes, cohesive colors, and smart detailing. To maximize impact, pick durable, low-maintenance options in timeless shades—think warm whites, soft greys, or muted naturals.
Use large-format porcelain or ceramic tiles to reduce grout lines, and pair with matte metal fixtures for a refined edge.
Consider eco-friendly options like recycled glass countertops, engineered stone, or bamboo cabinetry for sustainability without sacrificing style.
For surfaces that read high-end, choose uniform textures and seamless seams; avoid busy patterns that cheapen the look.
Integrate vintage-inspired designs through hardware shapes, lighting silhouettes, and trim details that nod to classic baths.
Keep storage clean and integrated to preserve a calm, cohesive space.
DIY Tweaks to Save Time and Labor
You’ll start by using time-saving tactics like pre-cut materials and quick-install methods to cut labor without sacrificing results.
Pair budget-friendly material choices with ready-to-use products to speed up installs while keeping the look you want.
Try labor-light DIY tricks that simplify tasks and minimize back-and-forth, so you finish faster with solid, lasting results.
Time-Saving Quick Tactics
To save time and labor in a bathroom renovation, start with a clear plan and ready-to-go materials to minimize backtracking. Prepare a simple checklist: tasks, sequence, and daily goals.
Use pre-cut materials when possible and batch similar tasks to reduce tool swaps. Opt for multi-function products to cut install time, like vanity kits with integrated storage and pre-finished panels.
Keep a small, organized work area to reduce search-time and misplacement of parts. Schedule deliveries to avoid stockouts and delays.
Stick to Eco friendly options when feasible, choosing low-VOC paints and water-saving fixtures.
If you like character, incorporate Vintage styles with minimal assembly and clear labeling.
Track progress daily, adjust priorities, and celebrate milestones to maintain momentum.
Budget-Friendly Material Choices
Curious about cutting costs without sacrificing quality? Start with materials you can install quickly and last long. Choose durable, easy-care surfaces like solid-surface laminate, porcelain tiles, or high-quality vinyl planks to minimize maintenance.
Eco friendly options exist in recycled-content tiles and low-VOC grouts that reduce odors and improve indoor air quality. Seek simple patterns and standard sizes to cut waste and fit faster.
For a timeless look, mix Vintage style ideas with modern finishes: a classic subway tile with a matte black trim, or a salvaged wood vanity paired with sleek hardware.
Prioritize water resistance and warranty coverage, and buy slightly overages of common cuts to avoid returns. Favor locally sourced options to skip long shipping times and support quick, budget-friendly renovations.
Labor-Light DIY Tricks
Tackling a bathroom refresh with minimal labor starts with smart, quick-win tweaks that fit alongside the budget-friendly materials you chose. You’ll save time by planning tasks in logical groups and using ready-to-install components.
Focus on door and cabinet hardware upgrades, peel-and-stick backsplashes, and pre-finished panels to avoid sanding or painting rooms. Use gravity-fed drain fittings and pre-cut trim to reduce measuring guesswork.
Choose simple, one-day projects like replacing faucets, updating lighting, and swapping towels and mirrors for a fresh look. When possible, pick Eco friendly options that still install quickly, and lean into Vintage inspired designs to create character without a full remodel.
Reuse salvage accents where feasible, and batch errands to minimize trips. Your streamlined approach keeps costs and disruption down.
Smart Storage Solutions on a Budget
Smart storage can stretch a tight bathroom budget without sacrificing function. You’ll maximize every inch with simple, sturdy solutions.
Start by wall-mounting shelves above the sink or toilet to free floor space and keep essentials within reach. Use clear, labeled containers for toiletries to streamline daily routines and reduce clutter.
Install a shallow medicine cabinet with a mirrored door to combine storage and a reflective surface. Over-the-door organizers and magnetic strips keep small items searchable but out of sight.
Opt for modular baskets that fit your vanity’s depth, enabling space optimization without buying new furniture. Choose hooks, rails, and a robe bar instead of additional furniture to preserve floor area.
Embrace creative organization to maintain a tidy, functional bath.
Budget Flooring, Wall Finishes, and Fixtures That Look Luxe
You can stretch your budget by choosing durable, low-cost flooring options that still look polished. Pair budget floors with luxe-looking wall finishes and simple fixtures to elevate the space without a big price tag.
Start with affordable upgrades like resilient vinyl or ceramic tiles, chic paint or wallpaper accents, and smart fixture upgrades that make a room feel cohesive.
Budget Flooring Choices
If you’re on a tight budget, start with durable, low-cost flooring that still looks great, like vinyl plank or ceramic tile with a faux-wood finish. Choose products with tight wear layers and easy maintenance to minimize replacement needs.
Eco friendly options, such as recycled-content planks or porcelain tiles, reduce environmental impact without sacrificing style. Look for textured patterns to hide minor imperfections and add depth underfoot.
Install a consistent base color to simplify future updates and make small bathrooms feel larger. Consider waterproof, grout-tight installations to prevent moisture damage and extend life.
For pricing, compare per-square-foot costs plus installation, not just sticker price. Prioritize durability, water resistance, and easy cleaning to maximize value over time.
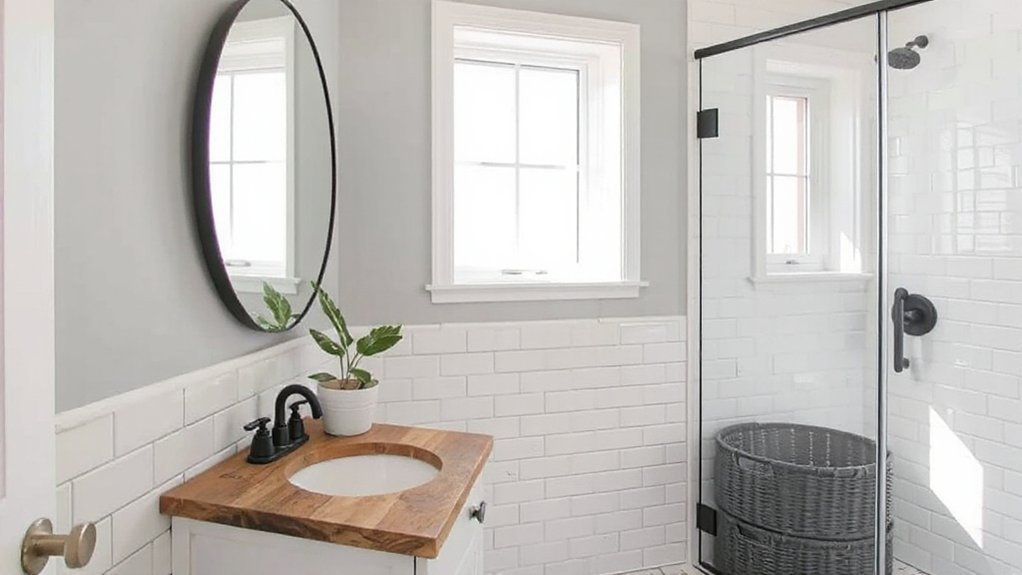
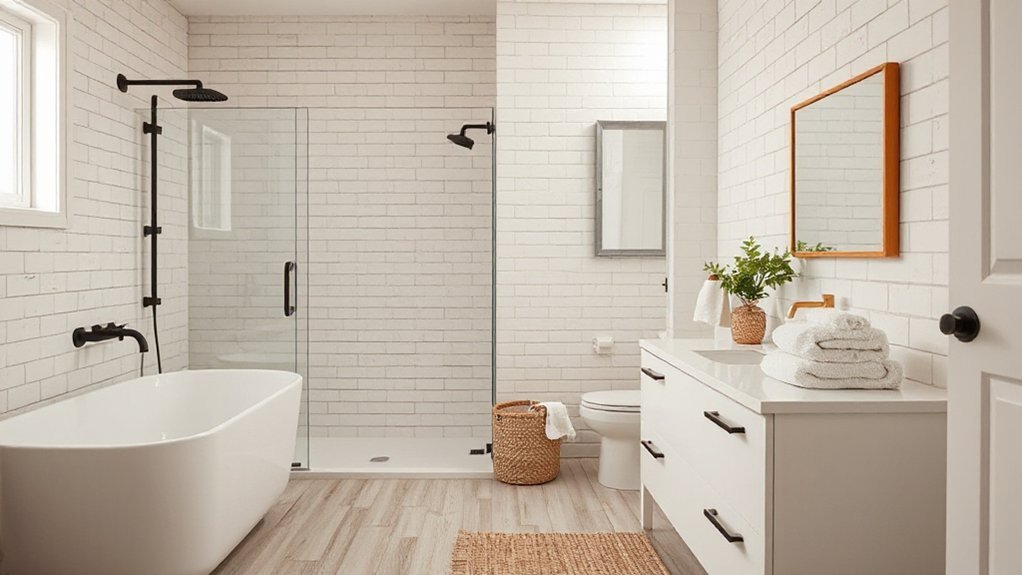
Luxe Wall Finishes
Luxe wall finishes can elevate a budget bathroom without breaking the bank, thanks to durable, affordable options that mimic high-end textures. You’ll achieve luxury textures without the price tag by choosing faux finishes, textured panels, or peel-and-stick wall coverings that resemble stone, tile, or plaster.
Prioritize a single wall or a recessed niche to create a focal point, then pair it with a smooth, complementary wall surface to avoid busy visual noise. For durability, opt for washable coatings or vinyl-wrapped panels designed for bathrooms, resistant to moisture and mold.
When selecting, consider a cohesive wall treatment that echoes your overall color scheme and hardware finishes. Keep seams minimal and edges clean to preserve the refined look you’re aiming for.
Affordable Fixture Upgrades
Budget-conscious upgrades can dramatically elevate a bathroom without a full renovation. You can swap in affordable fixture upgrades that deliver a luxe feel without tearing out walls. Prioritize timeless lines and durable finishes: look for matte black, brushed brass, or nickel hardware that coordinates with existing hardware.
Consider vintage fixtures for character on a budget; a retro-styled sink faucet or towel bar can anchor the room without a full redo. For practicality, choose eco-friendly options—water-saving faucets, low-flow showerheads, and recycled-material accessories—to reduce ongoing costs.
Budget-conscious shoppers should compare finishes, warranty terms, and local humidity resistance. Install simple updates like a coordinated vanity hardware set or matching cabinet pulls to unify the space. Keep installation straightforward to avoid unnecessary labor.
Choose Faucets and Hardware for Less
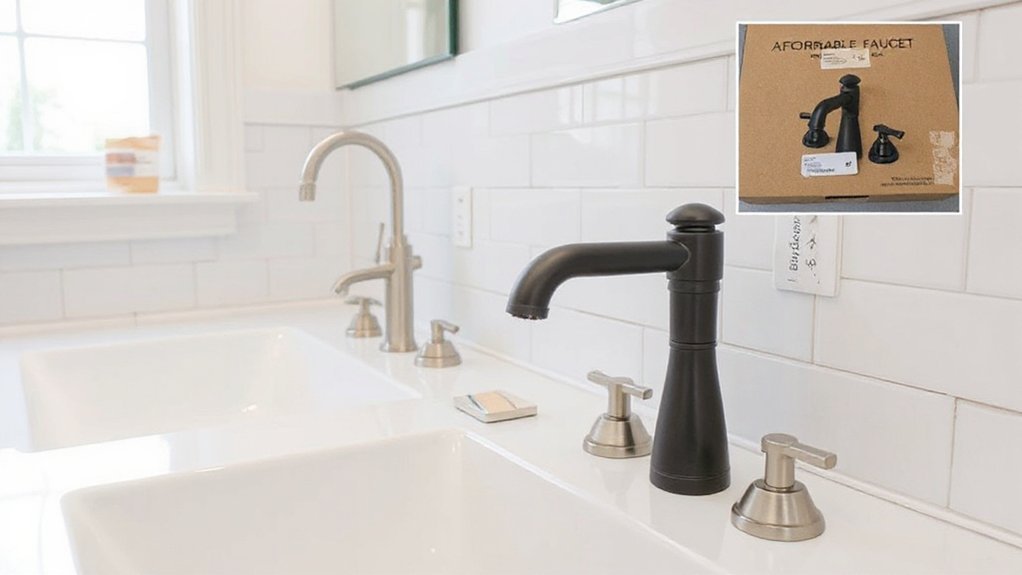
Choose faucets and hardware that deliver style without overspending by focusing on finishes that hide minor wear and standard sizes that fit existing holes. You’ll save time and money by prioritizing compatibility over novelty.
Look for finishes like brushed nickel, matte black, or chrome that mask minor scratches and fingerprints.
Opt for standard hole spacing (3 or 4 inches for centers) to avoid costly adaptations.
Vintage fixtures can add character without breaking the bank, but guarantee parts are widely available and reasonably priced.
Consider modern hardware with clean lines for a refreshed feel while staying affordable.
Read product specs for flow rate and water efficiency to cut future costs.
Test before buying, and assemble with basic tools to preserve quality and minimize professional fees.
When to Hire Pros vs. Do It Yourself
Decide early which tasks you can handle and where you’ll need a pro. You’ll save money by picking DIY for simple updates, like tiling accents, painting, or demo, but call in a pro for plumbing, electrical, or structural work.
Assess your skill, tools, and time; complex layouts or unfamiliar code requirements justify professional help. If you’re aiming for eco friendly options, some installations and inspections are safer with licensed pros to ensure compliance.
Align decisions with your budget and timeline, avoiding costly rework. For projects tied to historical restoration, lean on experts to preserve authenticity and longevity.
Use a hybrid approach: DIY where doable, hire pros for critical stages, and document warranties for future maintenance. Plan upfront to minimize interruptions and maximize value.
A 30-Minute Weekend Reno Prep Checklist
Getting your weekend reno off to a smooth start means a quick, focused plan that fits a 30-minute window. Gather a checklist: tasks, tools, and waste bags. Confirm you have basic safety gear, a respirator if dust is present, and eye protection.
Inspect the bathroom for ventilation gaps and note any obvious mold signs; plan immediate remediation or vent improvements as needed.
Clear the area: remove small items, lay a drop cloth, and tape edges to minimize dust spread. Prioritize ventilation, moisture control, and cleanability: run the exhaust fan, seal leaks, and wipe surfaces with a mild cleaner.
Measure keys: space, tile, and cabinet heights. Use a timer to stay on track, and document findings for a focused, budget-smart weekend session.
Frequently Asked Questions
How Can I Maximize Impact With a Tiny Budget?
Yes—start by prioritizing creative storage and color accents to maximize impact on a tiny budget. You’ll organize with vertical shelves and baskets, add a bold color pop, swap fixtures, and refresh with affordable paint and hardware upgrades.
What Are Hidden Costs Often Overlooked?
Hidden expenses sneak in as you plan, so monitor every line item. Expect unexpected fees for permits, delivery surcharges, contractor changes, and disposal. Track budgets closely, and set aside a contingency to cover unforeseen, often overlooked costs.
Which Fixtures Deliver Luxe Look on a Budget?
You don’t need splurges to look luxe: choose a luxury faucet and elegant lighting, and you’ll wow guests without wrecking your budget. You’ll shine with precise details, practical choices, and a witty, satirical rhythm guiding every install.
How Long Does a Budget Bathroom Renovation Realistically Take?
A budget bathroom renovation realistically takes 1–3 weeks, depending on scope. Plan around 2 weeks for most projects; you’ll finish faster with ready-to-install pieces. Include luxury accessories and color schemes to elevate the look efficiently.
What Are Easy Resale-Friendly Upgrades I Should Consider?
You’ll see resale magic with easy upgrades: DIY painting walls for instant freshness, and smart fixture upgrades like new faucet, vanity hardware, and lighting. It’s practical, precise, and fast, so you boost value without breaking the bank.
Conclusion
You’ve got this: with a clear plan and smart purchases, you’ll transform your bathroom without blowing the budget. Keep a running list, swap in budget-friendly finishes, and tackle DIY tasks where you can. Don’t skip essential updates—lighting, fixtures, caulk, and storage can punch well above their price. Remember, “a stitch in time saves nine”—prep, measure, and seal gaps now to avoid costly fixes later. Stay practical, precise, and patient, and you’ll finish strong.