Like a tight sleeve, your bathroom space can reveal its true shape if you trim the clutter. You’ll start by defining zones for wall storage, under-sink caddies, and over-door racks, then pick practical, budget-friendly pieces that fit your measurements. With clear bins and labeled containers, you’ll see what you actually use and where it belongs—and you’ll want to keep going to uncover even more hidden inches. Let’s outline the next steps.
Foundations of Compact Bathrooms: Space-Saving Principles

Foundations of Compact Bathrooms hinge on smart layout and deliberate storage choices. You optimize every square inch by prioritizing a vertical footprint, wall-mounted fixtures, and dual-purpose pieces.
Plan zones so wet areas, dressing, and storage don’t clash, keeping pathways clear and doors functional. Choose compact, multi-use furniture and recessed compartments to reduce bulk.
Color schemes should unify the space, using light neutrals with strategic accents to visually expand the room.
Lighting solutions matter: layered options—ambient, task, and mirror lights—eliminate shadows and brighten tight corners. Track or recessed lighting saves ceiling height, while dimmers offer flexibility for daily routines.
Install reflective surfaces to amplify natural light.
Finally, measure precisely, draft a simple flow, and test layouts before committing to fixtures.
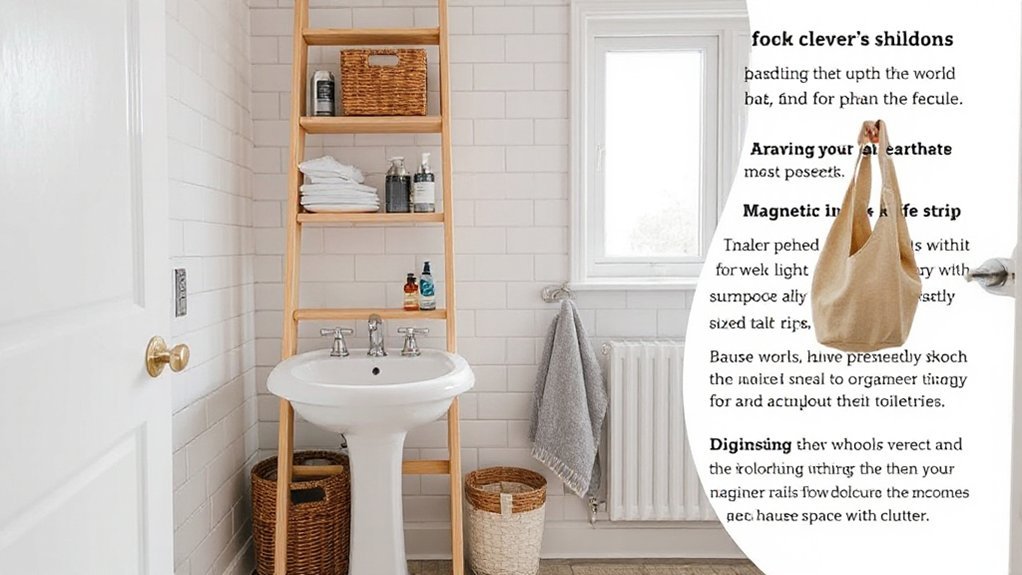
Wall Storage That Frees Counter Space: A Practical Guide
Wall-mounted shelves are your fastest route to reclaim counter space, so start with sturdy, wall-friendly options that won’t sag under load.
Pair vertical organizers with accessible zones above the sink and behind the toilet to keep daily essentials in reach yet out of the way.
Prioritize installation at eye level and use clear labeling to keep items tidy and easy to grab.
Wall-Mounted Shelves Best
A well-chosen wall-mounted shelf can free up counter space without sacrificing accessibility. Choose a size that fits your faucet height and mirror clearance, then mount at eye level for easy access.
Favor sturdy, moisture-resistant materials like sealed plywood or metal with a matte finish to minimize water damage. Install brackets or concealed supports to keep the surface clean and uncluttered.
Keep items grouped by function: daily skincare, hair care, and toiletries in reach, away from water splashes.
Decorative floating options add style without bulk, helping the space feel larger. Use color-coordinated baskets to corral smaller items, reducing visual chaos and making re-stocking quick.
This setup delivers practical storage, quick access, and a tidy, cohesive look.
Vertical Organizers Essentials
Vertical organizers build on sturdy shelves by turning vertical space into accessible storage. You’ll keep counters clear by grouping items in tall, reachable stacks.
Start with floating baskets to hold daily essentials without crowding surfaces; they drain visually and help you see what you own at a glance.
Use corner caddies to exploit tight alcoves, keeping toiletries organized without taking up square footage.
Install adjustable brackets so shelves adapt as needs shift.
Label bins so you restock efficiently and avoid rummaging.
Choose shallow tiers for frequently used items and deeper ones for backups, towels, or cleaning supplies.
Keep a regular rotation routine—every month, assess what’s visible and what’s hidden.
With this setup, accessibility and order become automatic.
Over-Door Organizers That Look Good and Save Space
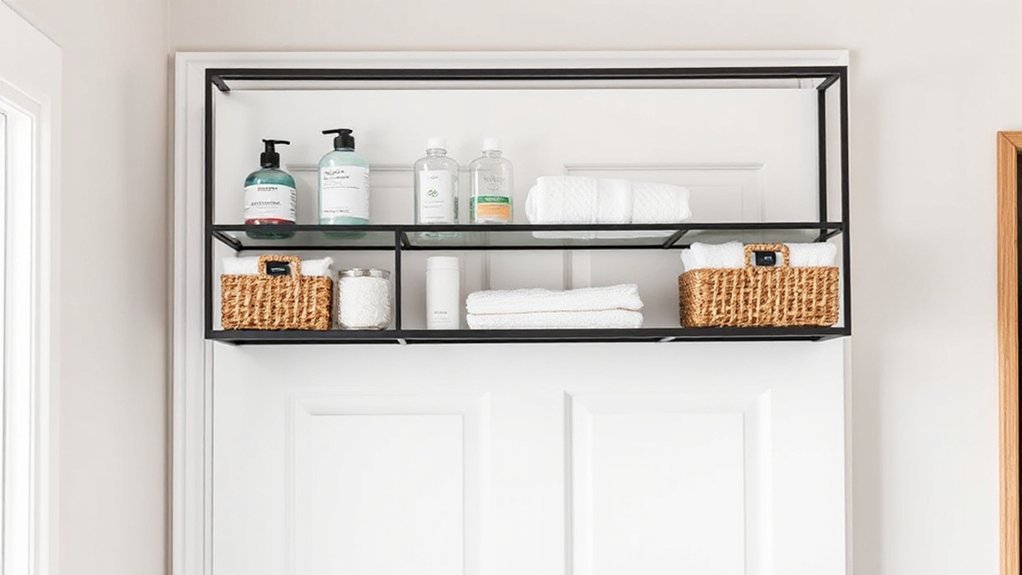
Over-door organizers are a simple, space-saving upgrade for any bathroom, and they can look as stylish as they’re practical. You’ll maximize vertical space without drilling, keeping essentials within reach.
Choose slim, steel or chrome racks for a clean, modern vibe, or woven fabrics for a softer look that complements decor. Confirm the frame fits your door width and doesn’t interfere with everyday use.
Install options range from hanging organizers to over-the-door mirrors, so you can add storage without sacrificing light. For a cohesive feel, coordinate with decorative curtain options that pull colors across the room, and consider Over door mirror solutions that reflect light and make the space feel larger.
Maintain balance by grouping items by frequency of use and keeping lids closed.
Hidden Caddies and Multipurpose Crates: What Works Where
Hidden caddies and multipurpose crates fit neatly into tight bathroom layouts by corralling essentials without clutter. You’ll place hidden caddies near the sink for daily items, like toothpaste and floss, keeping counters clear while still within reach. Choose slim, wall-mounted options or recessed cans that blend with your tile grid to maximize space.
Multipurpose crates excel on open shelves or under sinks, storing towels, brushes, and cleaners without creating bulk. Labeling or color-coding helps you grab what you need fast, cut downtime, and prevent cross-use among family members.
Use water-resistant finishes in damp zones, and secure crates to studs or sturdy hooks to prevent shifting. Match size to item volume, spacing for airflow, and you’ll sustain a clean, organized bathroom with minimal effort.
Modular Storage for Tight Bathrooms: How to Mix and Match
When space is scarce, mix and match modular storage to maximize every inch of a tight bathroom. Start with a basic framework: wall-mounted cubes, narrow towers, and a slim bench unit. Mix heights and depths to create defined zones for towels, cosmetics, and cleaning supplies, but keep sightlines clear.
Color coordination helps the eye read as one system, even with different shapes; choose a unifying palette or two complementary tones. Material selection matters: pair water-resistant laminates with powder-coated metal or bamboo for warmth.
Use adjustable shelves to adapt to changing needs, and secure wall units at eye level for quick access. Label bins or use clear fronts to reduce rummaging. Test spacing, then anchor everything to prevent tipping in tight, busy bathrooms.
Smart Organization Tactics to Maximize Every Inch
Smart organization hinges on smart placement: maximize every inch by pairing purpose-built organizers with a clear sightline. You should assess your bathroom’s flow first, then place high-use items within easy reach and low-use items higher up.
Use smart shelving to create vertical storage without sacrificing floor space, and group items by function to reduce digging. Choose innovative containers with uniform dimensions to simplify stacking and visibility. Label bins or opt for transparent fronts so you can identify contents at a glance.
Install adjustable shelves to adapt as needs change, and keep one accessible drawer for daily essentials. Minimize clutter by storing backups off the counter and inside vanity niches.
Maintain a clean, cohesive look by sticking to a consistent color and material palette.
Budget DIY Projects to Customize Your Bathroom Storage
If you want more storage without breaking the bank, start with simple, actionable projects that upgrade function and look. Budget DIY projects let you customize your bathroom storage without pricey upgrades.
Prioritize affordable materials that resist moisture, like bamboo, plastic bins, and powder-coated metal. Repaint unfinished wood to create a fresh, cohesive base for shelves and wall niches.
Use vertical space with affordable floating shelves and labeled containers for quick access. Create a dedicated medicine cabinet with a mirrored door or repurpose a shattered tile frame into a chic organizer.
For styling, add creative decor through cohesive baskets, liners, and label sticks. Finish with brushed hardware to unify the setup and keep clutter under control.
Frequently Asked Questions
How Do I Measure for New Storage Before Buying?
To measure for new storage, check door and cabinet depths, note wall space, and account for plumbing. Use measuring tape and level; record heights, widths, depths. Guarantee Measuring accuracy guides Storage planning, so items fit cleanly and airflow remains.
What Materials Resist Bathroom Humidity Best?
Water resistant materials top the list, and mold resistant finishes help you keep it clean. You’ll want fiberglass, PVC, stainless steel, porcelain, and epoxy coatings; they resist humidity, prevent mold, and stay durable under bathroom conditions.
Can Small DIY Projects Avoid Plumbing Hazards?
Yes, you can, if you prioritize planning and precautions. You’ll avoid hazards by focusing on plumbing safety, using proper tools, and knowing when to call a pro; practice safe DIY plumbing and test thoroughly before using.
How to Hide Cords and Outlets Creatively?
Yes, you can. Use cable concealment behind lightweight raceways, paint to match walls, and route cords along edges. For outlets, install discreet outlet disguises and a low-profile cover plate, keeping cords organized and accessible without clutter.
Which Finishes Hold up With Daily Cleaning?
Durability testing shows that matte ceramic and brushed nickel finishes hold up best under daily cleaning; finish comparisons favor epoxy coatings for water exposure. You’ll choose durable, easy-care options, and you’ll maintain timeless look while avoiding frequent refinishes.
Conclusion
Think of your bathroom like a tiny apartment—every inch counts. You’ll save space by wall-mounting, using clear bins, and tucking items behind doors. I once watched a small bath go from chaos to calm with a simple over-door rack and under-sink caddy. In a week, drawer chaos dropped 60% as labels and modular pieces clicked into place. Practical, budget-friendly tweaks like these keep essentials at hand and your space proudly organized.