Home Improvement Projects For Winter Checklist
Winter has a habit of exposing every weakness in a home that the warmer months allowed you to ignore. The draught under the back door that was merely noticeable in October becomes genuinely unpleasant in January. The bedroom that felt slightly cool in September becomes the room nobody wants to sleep in by December. The gutters that needed clearing in autumn are now overflowing every time it rains, sending water down the outside wall in a way that isn’t doing anyone any favours.
The good news is that winter is not just a season for huddling under blankets and ignoring the problem. It’s also one of the best times of year to tackle a range of home improvement projects — some designed to make the immediate winter more comfortable, others that lay the groundwork for bigger projects in spring and summer, and others that protect the fabric of your home against the specific pressures that cold, wet weather brings. Many of these projects are more affordable than homeowners assume, deliver immediate and tangible benefits, and can be completed without professional help.
Here is a practical guide to the best home improvement projects to tackle during the winter months.
Draught Proofing: The Highest-Impact Low-Cost Project
If you do one thing to your home this winter, make it draught proofing. It is consistently one of the highest-impact, lowest-cost improvements available to UK homeowners, and the difference it makes to comfort levels — particularly in older properties — is immediate and noticeable.
Uncontrolled draughts occur wherever cold outside air can enter the building without passing through a deliberate ventilation point. Common culprits include gaps under external doors, around window frames and sash windows, through letterboxes, around loft hatches, through gaps in floorboards, around pipework passing through external walls, and through unused fireplaces. Each of these is addressable with products available from any DIY retailer — draught excluder strips, letterbox brush seals, chimney balloons, flexible filler for pipe penetrations, and purpose-designed draught excluders for the bases of doors.
A thorough draught proofing of a typical three-bedroom house costs between £100 and £300 in materials if you do it yourself, and between £200 and £600 if you hire a professional draught proofing service. The annual saving on heating bills can be several hundred pounds for a draughty older property, giving a payback period measured in weeks or months rather than years.
One important distinction: draught proofing means sealing uncontrolled gaps, not eliminating all ventilation. Good indoor air quality requires some controlled air exchange, and completely sealing a home without providing alternative ventilation can lead to condensation, damp, and poor air quality. Purpose-designed trickle vents in window frames provide background ventilation while minimising heat loss.
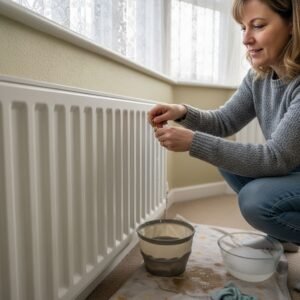
Bleeding Radiators and Balancing the Heating System
If your radiators have cold patches — particularly at the top — they contain trapped air that is preventing hot water from circulating efficiently. Bleeding the radiators releases this trapped air, restores full circulation, and improves both the warmth of individual rooms and the overall efficiency of the heating system. It costs nothing but a radiator bleed key, a few minutes per radiator, and a cloth to catch the small amount of water released when the air escapes.
Once radiators have been bled, it’s worth checking whether the heating system is balanced — meaning that all radiators reach their target temperature at roughly the same rate. An unbalanced system produces some radiators that are very hot while others remain barely warm, which is inefficient and often the source of rooms that never seem to heat up properly. Balancing involves adjusting the lockshield valves on individual radiators — a process that is well documented online and achievable with basic DIY skills, though it requires patience and a thermometer to do properly.
If your boiler pressure has dropped — check the pressure gauge on the front of the boiler, which should typically read between 1 and 1.5 bar — topping it up via the filling loop is a simple process described in your boiler’s manual. Low pressure reduces the efficiency of the heating system and can trigger the boiler’s fault codes.
Lagging Pipes to Prevent Freezing
Frozen pipes are one of the most damaging and expensive problems a UK homeowner can face in winter. When water freezes inside a pipe, it expands and can crack or burst the pipe — leading to flooding when the ice eventually thaws. Pipes most at risk are those in unheated areas: loft spaces, garages, outbuildings, and exposed runs on external walls.
Pipe lagging — insulating foam tubes available from any plumbers’ merchant or DIY store — is the simplest and most effective protection against frozen pipes. It is inexpensive, easy to fit, and takes only a few hours to install on the most vulnerable pipe runs in a typical home. The cost of lagging the pipes in a loft is a few tens of pounds at most. The cost of dealing with a burst pipe and the resulting water damage runs to thousands.
Lagging water tanks in the loft is equally important. Cold water storage tanks that are inadequately insulated are a common source of freeze damage, and tank insulation jackets are available for a very modest outlay. Check also that the loft hatch is insulated on its upper face, as a cold loft is significantly more likely to result in frozen pipes and tanks than one that retains some warmth from the house below.
Clearing Gutters and Checking Drainage
Blocked gutters are one of the most consistently underestimated sources of property damage in the UK. When gutters overflow — as they inevitably do when blocked with leaves, moss, and debris — water runs down the outside of the building rather than being channelled away via the downpipe. Over time, this saturates the wall below, leading to damp penetration, frost damage to brickwork and mortar, and in serious cases structural deterioration.
Clearing gutters is a straightforward task requiring a ladder, gloves, a bucket, and an hour or two for a standard house. If working at height is not something you’re comfortable with, gutter cleaning services are widely available and typically cost £50 to £150 for a standard property. The investment is trivially small relative to the cost of repairing damp-damaged walls or replacing guttering that has been allowed to deteriorate through neglect.
While you’re up there, check the condition of the gutters themselves. Look for cracks, splits, sagging sections, or joints that have opened up and are allowing water to escape. Check that downpipes are clear — a blockage lower down can cause water to back up and overflow from the gutter above even when the gutter itself is clean. And check that downpipes discharge effectively, either into a drain or onto a surface that directs water away from the building’s foundations.
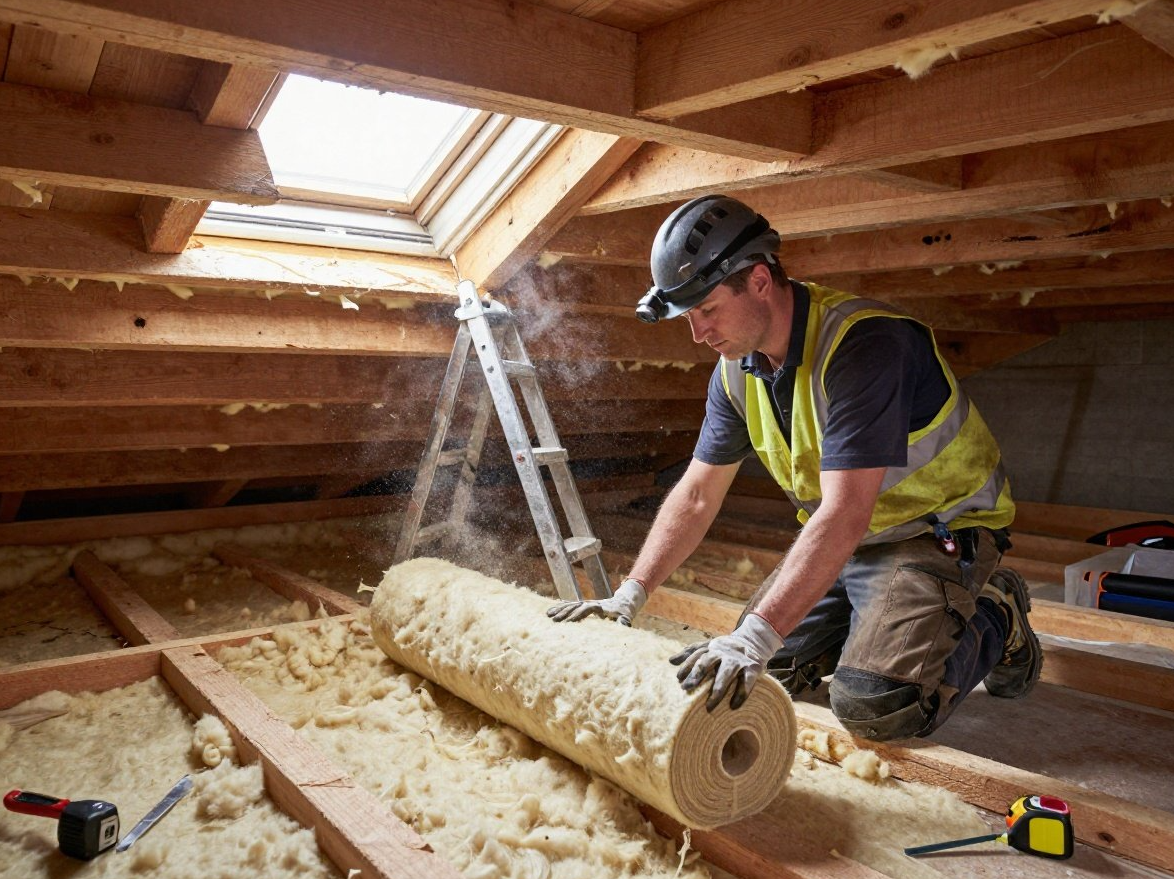
Insulating the Loft
If your loft insulation is thin, patchy, or absent entirely, winter is the season when the consequences are most keenly felt — and the motivation to address it is highest. Heat rises, and in an inadequately insulated loft, a significant proportion of the energy used to heat your home escapes directly through the roof. The current recommended depth for loft insulation is 270mm; many older UK homes have 100mm or less.
Topping up loft insulation from 100mm to 270mm is a project most homeowners can tackle themselves with mineral wool insulation rolls available from DIY retailers. The process involves laying a first layer between the joists and a second layer at right angles across the joists, ensuring there are no gaps or cold bridges. The cost of materials for a typical semi-detached house is £200 to £400 if you do it yourself, or £300 to £600 for professional installation.
Households on certain benefits or with lower incomes may qualify for free loft insulation through the government’s Great British Insulation Scheme or the Energy Company Obligation scheme. It is worth checking eligibility before paying for installation privately.
Checking and Improving Window Seals
The seals around double-glazed window units deteriorate over time, allowing both draughts and moisture to penetrate. Signs of failing window seals include condensation appearing between the glass panes — which indicates that the hermetic seal on the double-glazed unit has broken down — cold draughts around the window frame, and visible gaps or cracking in the mastic seal between the frame and the surrounding wall.
Failed double-glazed units where condensation has formed between the panes cannot be repaired — the unit needs to be replaced. However, the frame itself is often still serviceable, and replacing just the glass unit rather than the entire window is considerably cheaper than a full window replacement. Specialist glass replacement companies can supply and fit replacement units for most standard window sizes at a fraction of the cost of new windows.
Gaps between window frames and the surrounding wall can be sealed with fresh external-grade mastic, which is a straightforward DIY task requiring a cartridge gun and a damp finger to smooth the seal. Replacing perished draught seal strips inside window frames is equally simple and dramatically reduces draughts around windows that are structurally sound but no longer sealing effectively.
Decorating: Making the Most of Indoor Time
Winter is the natural season for interior decorating, and there are practical reasons beyond the obvious one of having more time indoors. Paint and decorating products perform better at room temperature, which is easier to maintain in winter when the heating is running than in the height of summer when rooms can get very warm. Decorating in winter also means that rooms are refreshed and looking their best by the time spring arrives and you’re more likely to be entertaining or spending time in the garden with doors and windows open.
Preparation is the element of decorating that most DIY painters underinvest in, and it’s the element that most determines the quality and durability of the finished result. Filling cracks and holes, sanding back rough areas, washing surfaces that have accumulated grease or grime, and applying primer to bare wood or fresh plaster all contribute to a finish that looks professional and lasts. Rushing the preparation to get to the painting quickly is the most consistent source of disappointing DIY decorating results.
Winter is also the ideal time to address that perennial source of domestic dissatisfaction — the hallway, landing, or spare room that has been on the decorating list for longer than anyone is comfortable admitting. Starting and finishing a contained decorating project during the winter months provides a tangible sense of progress and improvement that carries through into the rest of the year.
Checking the Roof From the Inside
You don’t need to go onto the roof to carry out a useful preliminary check of its condition — you can do it from inside the loft with a torch. On a dry day, check for daylight showing through the roof covering, which indicates missing or cracked tiles or slates. Check the condition of the felt underlay beneath the tiles — it should be intact and not sagging significantly between the rafters. Look for water staining on the felt, the timbers, or the loft insulation, which indicates past or ongoing water ingress.
After a period of heavy rain, a further check with a torch can reveal active leaks that weren’t apparent in dry conditions. Water staining on rafters, wet insulation, or drips from the roof structure all warrant professional investigation before the problem progresses and causes damage to the ceilings below.
Checking the condition of the chimney stack — where applicable — is also worth doing from the outside on a dry day. Cracked or spalled brick, missing pointing, a leaning stack, or a damaged flaunching (the mortar at the base of the chimney pots) are all signs that the chimney needs professional attention. Chimney problems left unaddressed can lead to water ingress into the roof structure and, in serious cases, structural instability.
Smart Heating Controls and Thermostatic Radiator Valves
If you’re still heating your home with a basic programmable thermostat or — worse — manual controls, upgrading to a smart heating system is one of the most immediately impactful improvements you can make during the winter months. Smart thermostats such as the Nest, Hive, or tado° learn your household’s patterns, allow you to control your heating remotely via your smartphone, and optimise heating schedules to avoid heating an empty house — all of which translate directly into lower heating bills without any reduction in comfort.
Adding thermostatic radiator valves (TRVs) to radiators throughout the house allows individual room temperature control, meaning you can reduce the heat in rooms that are rarely used while maintaining comfortable temperatures in the rooms you actually live in. Smart TRVs — which can be controlled via an app and integrated with a smart thermostat — take this a step further, allowing automated room-by-room heating schedules that can deliver meaningful additional savings beyond the smart thermostat alone.
The cost of a smart thermostat with professional installation is typically £150 to £300 depending on the product and your existing heating system. Smart TRVs cost approximately £40 to £60 per radiator. The payback period for both investments, through reduced heating bills, is typically one to two years.
Planning Spring and Summer Projects
One of the most underappreciated uses of winter for homeowners with bigger improvement plans is as a planning and preparation period for projects that will be executed in the warmer months. Extensions, loft conversions, garden projects, and external renovations are all significantly easier and cheaper to carry out in spring and summer — but the groundwork of getting planning permission, choosing architects, obtaining quotes, and selecting contractors can and should happen during the preceding winter.
Planning applications can take eight to twelve weeks or more to be determined. Architects need time to produce drawings. Good contractors are booked well in advance. Starting these processes in winter means that when spring arrives and conditions are ideal for external work, your project is ready to proceed rather than still in the early stages of planning. The homeowners who get the best contractors at the best prices are typically those who book them months in advance — not those who start looking in April for work they want done in May.
Conclusion
Winter is not a season to put home improvement on hold. It’s a season of immediate priorities — draught proofing, pipe lagging, gutter clearing, and heating system maintenance — that protect your home and your comfort during the coldest months. It’s also a season of longer-term preparation, using the indoor time productively to plan, decorate, insulate, and get the projects that will transform your home in spring and summer properly lined up and ready to go.
The homes that are most comfortable in winter, most protected against the specific risks that cold and wet weather brings, and best placed to benefit from spring improvements are those whose owners treat the season as an opportunity rather than something to endure. Pick your projects, work through them systematically, and by the time the clocks go forward your home will be in materially better shape than it was when the clocks went back.
FAQs
What is the most important home improvement project to do in winter?
Draught proofing delivers the best combination of low cost, ease of implementation, and immediate impact on comfort and heating bills. For homes with thin or absent loft insulation, topping this up runs it very close. Both projects can be completed in a weekend, cost relatively little, and make a noticeable difference from the first cold night after they’re done.
Can I decorate in winter or is it better to wait for warmer weather?
Interior decorating is perfectly well suited to winter conditions. Paint and filler products perform best at consistent room temperatures, which are easier to maintain in winter with the heating running. The main considerations are ensuring adequate ventilation when painting — open a window slightly even in cold weather — and allowing sufficient drying time between coats, which may be slightly longer in cold conditions.
How do I know if my pipes are at risk of freezing?
Pipes in unheated spaces — lofts, garages, outbuildings, and on external walls — are most at risk. If you can see bare copper or plastic pipework in your loft or garage that is not covered with foam lagging, it is vulnerable in cold weather. Lagging these pipes before temperatures drop below freezing is a straightforward and inexpensive precaution that could save thousands in damage.
Is it worth getting a boiler service in winter?
Ideally a boiler service should be carried out in autumn before the heating is needed most heavily, but if you missed this, a winter service is still worthwhile. A serviced boiler runs more efficiently, is less likely to break down at the worst possible time, and a service provides an annual opportunity to identify and address any developing issues before they become failures. Annual boiler servicing is strongly recommended and is typically required to maintain the manufacturer’s warranty on newer boilers.
Can I start a loft conversion or extension project in winter?
The construction work itself is harder to carry out efficiently in winter — cold weather affects materials, shorter days reduce working hours, and wet conditions can cause delays. However, winter is the ideal time to carry out all the preliminary steps: engaging an architect, submitting a planning application, obtaining contractor quotes, and finalising specifications. Starting this process in winter means construction can begin as soon as conditions improve in spring, rather than losing the best building months to preparation work that could have been done earlier.