You might be surprised to learn that the wall’s structure governs every step, not just the shelf size. Start by identifying your wall type and load needs, then pick brackets and hardware that match. You’ll locate studs precisely, level your cleat, and secure it firmly before sliding the shelf in. If gaps appear, you’ll conceal them with trim or caulk and run a quick stability check—but a small detail could change everything, so you’ll want to keep going.
Determine Your Wall Type and Load Needs

To determine your wall type and load needs, start by identifying what the wall is made of and how much weight you plan to hang. You’ll check for drywall, plaster, or masonry, and note any studs or backing behind the surface.
Use a stud finder to locate solid anchors and confirm spacing. Then estimate load capacity based on wall material.
For light shelves, lightweight anchors may suffice; heavier loads require mounting into studs or masonry anchors with appropriate screws.
Consider wall textures, which can affect finish and support, and plan accordingly.
Painting tips matter when prep and patching are needed before install, so address blemishes promptly.
Record measurements, mark stud locations, and choose hardware rated for your intended load.
This preparation guarantees secure, reliable support.
Choose Brackets and Hardware for Your Shelf Weight
Choosing brackets and hardware tailored to your shelf weight starts with matching the load to rated components. You’ll pick brackets rated for the total weight, not just the shelf itself, and confirm hardware compatibility with your wall type.
Use corrosion-resistant screws and appropriate anchors for plaster, drywall, or masonry, ensuring each fastener shares the load. Consider decorative accents that still meet strength requirements; weight distribution matters, so opt for longer brackets that provide better leverage.
Check shelf materials for core density and edge exposure, then select hardware that suits the material without protruding excessively. Avoid over-tightening, which can strip anchorage.
Document all specifications, including bracket width, arm length, and weight ratings, so you can reference them during installation and future load adjustments.
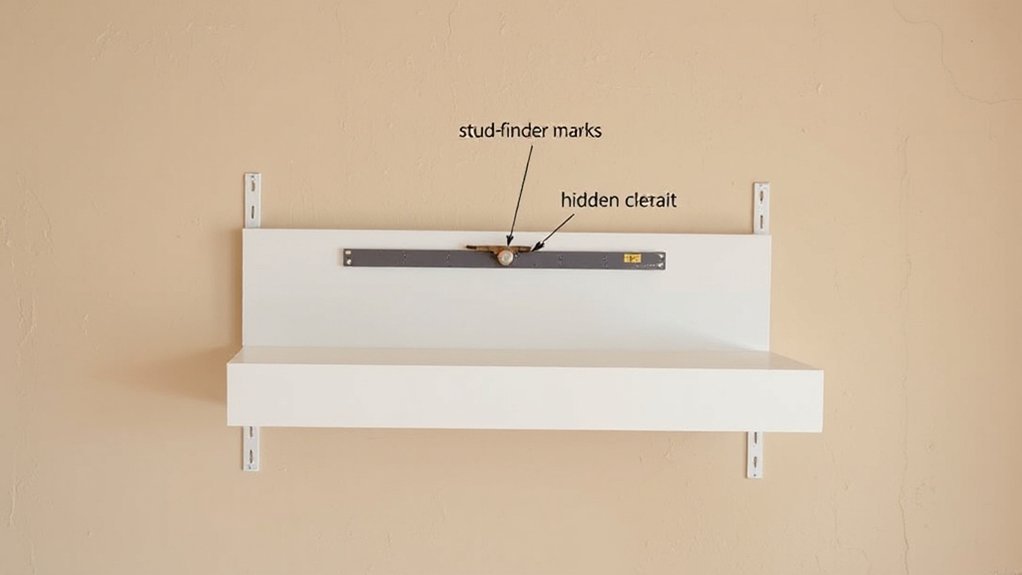
Find Studs and Mark Precise Screw Positions
Start by locating wall studs precisely using a stud finder and a straightedge. Then confirm the center of each stud to align your screws.
Mark exact screw positions on the wall, ensuring even spacing that matches your shelf brackets.
Double-check center alignment across at least two studs to prevent tilt or shift once the shelf is mounted.
Locate Wall Studs Precisely
Locating wall studs precisely is essential before mounting a shelf. Start by identifying your wall type and choosing a method you trust. If you’re using a stud finder, calibrate it per the manufacturer’s instructions, then sweep slowly in a vertical line where you plan to mount the bracket.
Listen for a solid buzz or watch the detector’s readings, confirming a stud’s location. When you mark, place a light pencil dot at the expected spot, then probe gently with a small nail to verify.
Consider wall texture; thick textures can obscure the edge, so mark near the center of the stud’s width. Note typical stud spacing and avoid misreads on adjacent zones to guarantee solid support.
Mark Exact Screw Positions
Once you’ve pinpointed where the studs sit, move on to marking the exact screw positions. Use a pencil to strike through the mounting bracket holes onto the wall, aligning them with the stud centers. Measure from edge to edge to guarantee symmetry and maintain level placement. Note the top screw line slightly above mid-height to accommodate bracket thickness.
Transfer each hole location with a marking punch or fine nail tap, then double-check spacing with a ruler. If the shelf has multiple mounting points, plan an even grid that distributes weight and supports decorative accents. Reconfirm that marks don’t collide with outlets, switches, or trim.
Erase any stray marks, then drill pilot holes, keeping the bit straight. Your goal: precise points that aid clean, secure shelf styling.
Verify Stud Center Alignment
Before you drill, confirm the stud centers precisely to guarantee strong, secure mounting. Locate each stud using a stud finder, then verify by tapping for a solid hollow-free sound. Mark the exact center of every stud with a light pencil line; this is where your screws will align, so precision matters.
Measure between marks to ensure they correspond to the shelf’s mounting bracket pattern, adjusting for any slight deviations in wall framing. Transfer the centers to the wall using a level, creating a straight, evenly spaced line for repeatable results.
Consider how decorative accents will sit above the screws and how shelf materials respond to weight. Double-check screw size and depth, then predrill pilot holes to prevent splitting. This alignment minimizes wobble and maximizes load capacity.
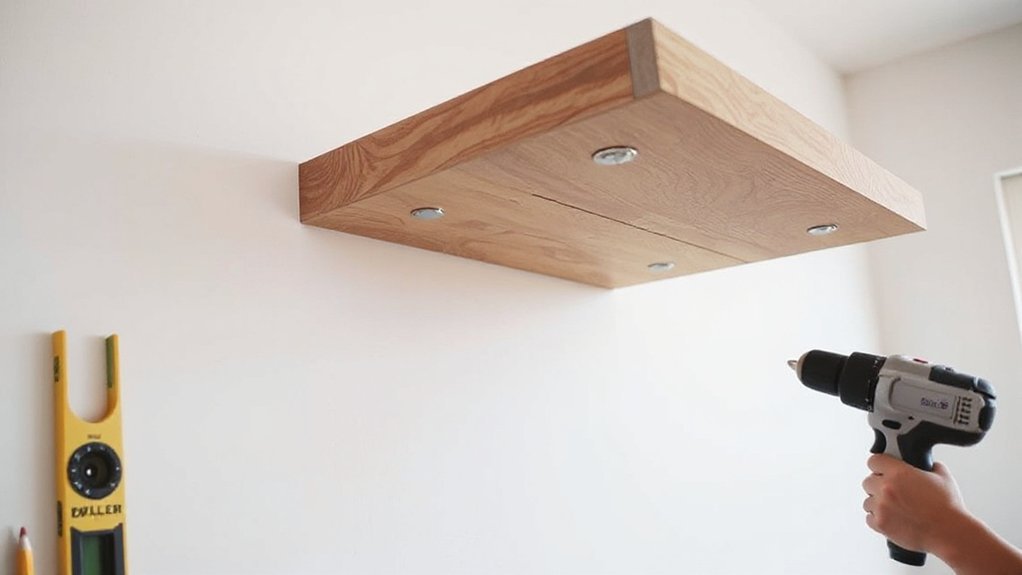
Install the Mounting Plate or Cleat
Start by preparing the mounting plate or cleat and the wall you’ll attach it to. Measure and mark stud locations, then align your mounting plate or cleat with the marks. Use a level to ascertain it’s perfectly horizontal, correcting any tilt before you drill.
Pre-drill pilot holes to prevent wood splitting, then drive appropriate screws into the studs. If you’re mounting a cleat, attach the cleat to the wall with two screws per stud and verify its level again.
For a mounting plate, center it over the stud line and secure it with the same number of screws, checking for level once more. Leave no exposed hardware or gaps; the mounting plate or cleat installation should feel solid and precise, ready to support the shelf securely.
Avoid overtightening.
Attach the Shelf to the Mounting Hardware Securely
Attach the shelf to the mounting hardware securely by aligning the shelf’s keyhole slots or mounting cleats with the corresponding hardware you installed, then slide it into place until it’s firm against the wall.
Once seated, test with light pressure across the span to verify solid contact and even support. If it rocks, adjust by nudging the cleats or tightening hidden fasteners per your mounting system’s instructions.
Check that the shelf materials aren’t overtightened, which could crack or bow over time.
Install decorative accessories only after confirming the weight distribution won’t exceed the system’s rated capacity.
Distribute weight evenly, placing heavier items toward the center or along the reinforced sections.
Avoid overloading with bulky decor; keep alignment perpendicular to the wall for a clean look.
Conceal Hardware for a Clean Floating Look

To achieve a clean floating look, focus on hidden mounting techniques that keep the hardware out of sight.
Plan for clean cable management by guiding cords behind the shelf and tucking them into discreet channels or grommets.
Keep the surface reveal flush by mounting hardware precisely and using shims or a level to guarantee the shelf sits evenly.
Hidden Mounting Techniques
Hidden mounting is the cornerstone of a clean floating shelf, and it starts by choosing hardware that disappears from view. You’ll use concealed fasteners that lock the shelf to the wall without protruding hardware.
Start by locating studs and marking precise mounting points, then install sturdy anchors if studs aren’t available.
Align the concealed fasteners with the shelf’s mounting rail, ensuring a flush, gap-free fit.
Attach hidden brackets to the wall at uniform spacing, checking levelness before tightening.
Slide the shelf onto the brackets, then secure with the corresponding fastener, keeping pressure even across the length.
Verify the shelf sits plumb and stable; any tilt indicates misalignment.
Finish by masking any tiny gaps with color-matched trim or caulk, maintaining a seamless, floating appearance.
Clean Cable Management
Cable management keeps the floating look clean by routing wires behind the shelf and out of sight. To start, plan a simple cable path from your devices to a power outlet. Use low-profile cable clips along the wall edge to guide cords neatly toward a chosen outlet or surge strip. Avoid loose loops; flatten cables against the wall with adhesive-backed mounts.
If you need multiple devices, consider a slim power strip mounted near the wall’s edge and plug it into a nearby power outlet. Conceal the strip with a small cable cover that matches wall color for a seamless appearance.
Label cables near the shelf for easy maintenance and future changes, ensuring only necessary cords run behind the unit. Cable routing minimizes clutter and preserves the floating aesthetic.
Flush Surface Reveal
Even with a sturdy mount, you can achieve a truly seamless look by minimizing visible hardware. Start with a recessed cleat or keyhole jig so screws disappear behind the shelf edge.
Use prefinished panels or a hidden-plip system that lets the shelf sit flush, with no gaps between wall and wood. Verify the wall is plumb and the cleat level before securing.
If you see slight misalignment, adjust by shimming behind the cleat rather than the shelf, preserving a clean surface. Seal any raw edges where the shelf meets the wall to prevent moisture intrusion.
Choose decorative accents that don’t require protruding hardware, and guarantee material durability by selecting solid wood or high-quality plywood with a durable finish.
This approach yields a stable, magazine-worthy flush surface reveal.
Troubleshoot Common Wall Challenges
If you run into wall challenges when installing a floating shelf, start by identifying the issue and choosing the right fix. You’ll fix most problems with a measured approach rather than guesswork.
First, assess whether the wall is hollow, reinforced, or cracked. If you locate hollow sections, insert wall anchors designed for your wall type and load rating; avoid over-tightening.
If the wall shows drywall damage, pause and repair the damaged area before proceeding to mount, ensuring a solid base.
When studs are unavailable where the shelf needs support, use a stud finder to confirm, then switch to heavy-duty anchors and distribute weight with a wider mounting plate.
Re-check alignment after each adjustment and test load gently to prevent future gaps or tilting.
Safety Checks and Maintenance for Floating Shelves
Now that you’ve tackled install fixes, you’ll want to build a routine of safety checks and maintenance to keep floating shelves stable and looking good.
Regularly inspect mounting brackets, screws, and anchors for looseness; tighten or replace as needed. Check for wall movement or cracking, especially in older walls or after heavy loads.
Clean shelves with a soft cloth to prevent dust buildup that hides instability. Relevel every few months or if you notice tilt, using a level and readjusting supports accordingly.
Use appropriate loads—avoid decorative accents that exceed weight ratings. Inspect the shelf’s surface for chips or moisture damage, repairing promptly to prevent warping.
Note wall texture changes near joints, as plaster or drywall repairs can affect support. Re-seal or repaint if finish degrades.
Frequently Asked Questions
How Do I Choose the Right Shelf Depth for a Small Wall?
Start by choosing shelf depth around 6–8 inches for tiny walls; avoid overwhelming space. Consider decorative accents and shelf material options, balancing weight and style. Measure available wall, test with mock-items, and err on shallower, lighter shelves.
Can I Mount a Floating Shelf Without a Stud?
Yes, you can, but only with proper anchors. For example, use a studless mount kit or toggle bolts. This decorative accents shelf supports lightweight items best. Choose shelf material options like plywood or MDF for secure, clean installation.
What Weight Limits Should I Expect for Metal vs. Wood Shelves?
Metal shelves usually handle more weight than wood, but limits depend on thickness and mounting hardware. Expect roughly 20–60 lb for wood, 40–100+ lb for metal, with proper anchors. Check shelf materials, mounting hardware ratings, distribute load.
How Do I Level Multiple Floating Shelves in a Row?
Level shelves by marking a straight reference line, join each with level across, then shim where needed; check again after mounting. Cable management helps hide cords, and consider shelf material options for uniform depth and strength, especially near edges.
Should I Use Wall Anchors for Brick or Concrete Walls?
Yes, use wall anchors designed for brick or concrete. Choose durable anchors, then drill, insert, and secure. For decorative finishes and shelf material, pair with a clean jig and precise aiming to guarantee level, strong holds.
Conclusion
With the shelf securely mounted, you’ll see a quiet, precise line hovering inches from the wall like a calm horizon. The weight is tucked into the studs, the cleat kissing the surface, hidden screws gleaming softly behind trim. You’ll run a level over it once more, wipe away stray dust, and admire the clean, almost magical float between wall and shelf. A final cable tuck, and your sturdy, sleek display awaits.