DIY Hardscaping: Step-by-Step Guide to Adding a Stone Pathway
A stone pathway is one of the most achievable and most rewarding garden DIY projects. It requires no specialist equipment, uses materials that are widely available and straightforward to work with, and delivers a result that looks professional and lasts for years. The key is preparation — specifically the sub-base — and patience in the laying stage.
This guide takes you through the complete process for a mortared natural stone pathway, which provides the most durable and best-looking result for a permanent garden path. Variations for dry-laid stepping stone paths and gravel paths are noted where the process differs.
What You Will Need
Materials
- Natural stone flags or slabs — Indian sandstone is the most popular choice for UK gardens: it is attractive, widely available, affordable relative to other natural stones, and easy to work with. Allow 10–15% extra over the measured area to account for cutting waste.
- Type 1 MOT compacted hardcore — for the sub-base. This is crushed stone aggregate that compacts to a dense, stable layer.
- Sharp sand — for the laying bed (if using a sand bed rather than mortar) or as a blinding layer over the sub-base.
- Mortar — either bagged ready-mix mortar or site-mixed using cement and building sand in a 1:5 ratio (one part cement to five parts building sand). For most domestic paths, bagged ready-mix in 25kg bags is the most practical option for DIY work.
- Pointing mortar — a slightly weaker mix (1:6 or brush-in compound) for the joints between stones.
- Edging boards or restraints — to hold the path edges in place while mortar cures, and to define the path width.
- Weed suppression membrane — laid over the excavated base before the sub-base aggregate goes in. This prevents weed growth from below without affecting drainage.
Tools
- Spade and fork for excavation
- Plate compactor (hire from a tool hire company — essential for compacting the sub-base correctly; hand tamping is inadequate for this purpose)
- Wheelbarrow
- Builder’s string line and pegs
- Spirit level and long straight edge (a 1.8–2.4 metre aluminium level is ideal)
- Rubber mallet
- Angle grinder or diamond disc cutter for cutting stones (hire if not owned — a 115mm angle grinder with a 4-inch dry diamond blade handles most stone cutting)
- Safety glasses, dust mask, and ear protection for cutting operations
- Pointing trowel or grout squeegee
- Stiff brush and hosepipe for cleaning
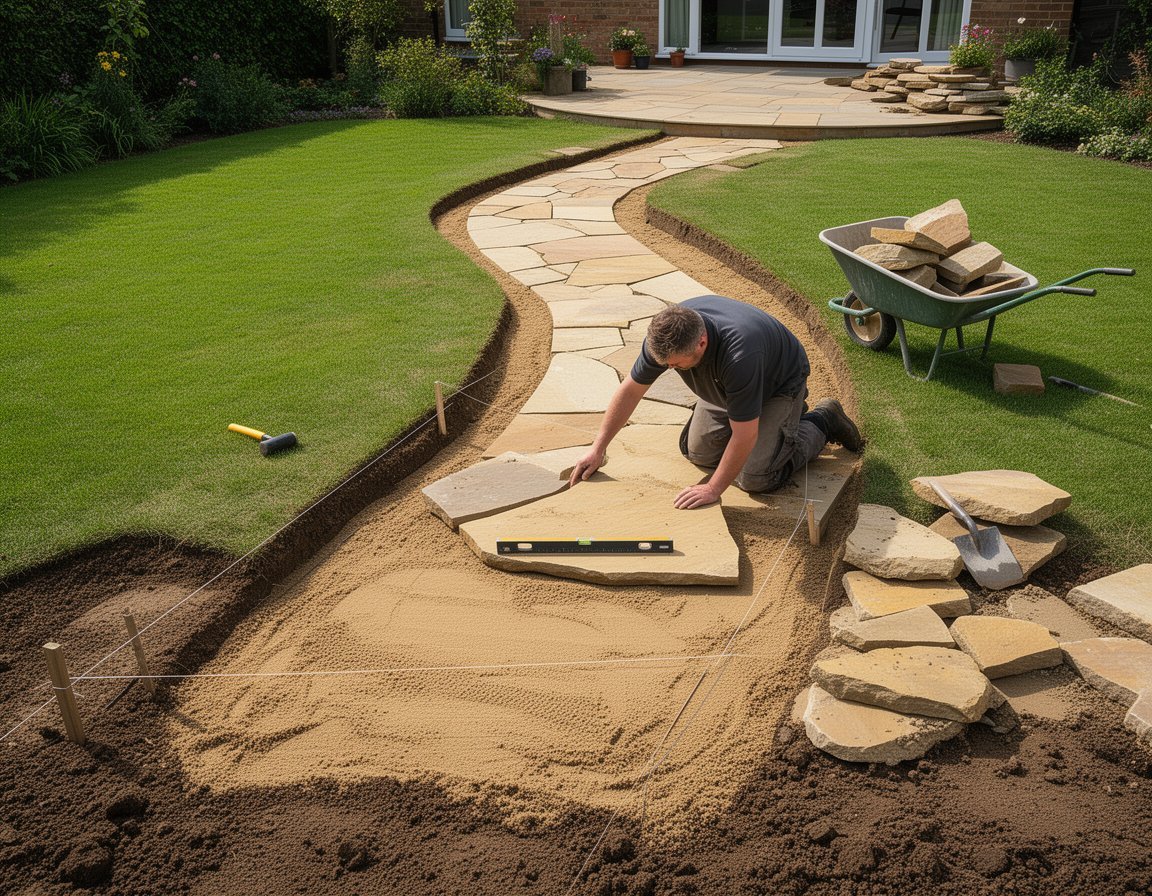
Step 1: Plan and Mark Out the Path
Before any digging begins, mark out the full path accurately on the ground.
Use a string line and pegs to define both edges of the path. For a straight path, stretch the string line between pegs at each end, making sure it is taut and level. For a curved path, use a garden hose to define the curve on the ground, adjust it until the line feels right, then mark it with a can of line-marking spray paint or by sprinkling dry sand along the hose.
Path width. A path that two people can walk side by side requires at least 1.2 metres. A single-use path should be a minimum of 600mm — 750–900mm is more comfortable. Whatever width you choose, account for the fact that stones are rarely an exact fit — work in widths that minimise cutting, based on the stone sizes available to you.
Calculate your material quantities. Measure the total area (length x width). Divide by the coverage per pack or per tonne for your chosen stone, and add 10–15% for waste and cutting. For Type 1 hardcore, calculate the volume at 100mm depth (length x width x 0.1) to get cubic metres, then convert to tonnes (1m³ of Type 1 ≈ 1.5 tonnes).
Step 2: Excavate the Path Area
The depth of excavation depends on the finished surface height relative to the surrounding garden:
- Sub-base (Type 1 hardcore): 100mm
- Laying bed (mortar or sand): 30–50mm
- Stone thickness: typically 22–50mm depending on the product (most standard paving flags are 22–38mm; thicker sett-style stones run to 50mm)
Total excavation depth: typically 175–200mm below finished surface level for a mortared path.
If the surrounding lawn or garden is at a level you want to match, the excavation depth is measured down from the existing ground level. If you are setting the path slightly higher than the lawn (for drainage), adjust accordingly.
Remove all topsoil from within the marked path area. Topsoil contains organic material that breaks down over time, causing subsidence and movement in the surface above it. The sub-base must sit on stable subsoil, not on topsoil.
Dig neatly to your string lines, keeping the sides of the excavation vertical. Use a spade to trim the edges to the marked line.
Step 3: Install the Sub-Base
The sub-base is the foundation of the entire path and the step that most DIYers either under-depth or under-compact. Getting it right is more important than any decision about stone colour or laying pattern.
Lay the weed suppression membrane over the excavated base, overlapping joins by at least 300mm and turning the edges up against the sides of the excavation.
Add Type 1 hardcore in layers of no more than 75mm at a time. If your total sub-base depth is 100mm, put in 75mm, compact, then add the remaining 25mm and compact again.
Compact using a plate compactor. Make two or three overlapping passes over each section before adding more material. The surface should feel firm and resistant when you walk on it — there should be no movement or spongy feeling. A properly compacted sub-base is the single most important determinant of how long the finished path will last. A poorly compacted sub-base will settle unevenly, causing the surface stones to move, crack, or become trip hazards.
Check the level and fall. Use your long straight edge and spirit level to check that the compacted sub-base is at the correct depth below your intended finished surface level, and that any required drainage fall is incorporated. A minimum fall of 1:60 toward the lower edge (6mm drop per 360mm run) is required for water to drain reliably.
Step 4: Prepare the Laying Bed
For a mortared path, the laying bed is a semi-dry mortar mix — sometimes called a dry mix or mortar spot — on which each stone is pressed and adjusted before the mortar cures.
Mix the laying mortar at approximately 1:5 (cement:building sand) to a consistency that holds its shape when squeezed in your hand but is not wet. It should not be sloppy. A semi-dry mix allows the stone to be bedded firmly and adjusted during laying without the stone slipping on a wet mix.
Apply the mortar bed to an area of approximately 1–1.5 m² at a time — do not spread further ahead than you can lay in 20–30 minutes, as the mortar will begin to stiffen. The bed depth should be consistent at 30–40mm, giving enough depth to compress and adjust the stone to the correct level.
Rake the mortar bed level using a notched trowel or straight edge, leaving a consistent surface.
Alternative: sharp sand laying bed. For a dry-laid path (without mortar, primarily for stepping stones in a lawn), a 30–50mm layer of sharp sand is used instead of mortar. Stones are pressed into the sand and adjusted to level. Dry-laid paths are quicker and easier to install but less durable, and stones will shift more over time without the rigidity of mortar.
Step 5: Lay the Stone
Begin at the most visible or most used end of the path — typically the end nearest the house — and work toward the far end. This ensures that any adjustments for cuts fall at the less prominent end of the path.
Place each stone on the mortar bed and press it firmly down, twisting slightly as you push to ensure full contact between the stone and the mortar. The goal is complete, even contact across the whole underside of the stone — any voids beneath the stone will cause it to rock, crack under load, or fail prematurely.
Check level constantly. After each stone is placed, check it with your spirit level in both directions (along and across the path) and in relation to adjacent stones. A straight edge placed across two or three stones will reveal any high or low areas. Use the rubber mallet to tap the stone down where it needs to come lower; add a small amount of extra mortar where it needs to come higher (do this promptly before the surrounding mortar stiffens).
Leave consistent joints between stones. For a natural stone path, joints of 10–15mm provide a practical width that is easy to point and looks appropriate for the material. Smaller joints are difficult to point cleanly; larger joints can look gappy. Some laying patterns (random irregular) have variable joint widths, which is fine — avoid joints narrower than approximately 8mm.
Work from a scaffold board laid on previously set stones rather than kneeling directly on them — this spreads your weight and prevents disturbing freshly laid stones before the mortar has taken.
Keep the path consistent in level and fall throughout. Check back regularly against the string line to ensure you have not drifted in any direction. Small errors in level that go uncorrected compound over multiple stones into a visually obvious problem.
Step 6: Cut Stones for Edges and Awkward Shapes
Cutting stone requires an angle grinder with a dry diamond blade, or a disc cutter. Both produce stone dust — wear safety glasses, a dust mask (minimum FFP2 rating), and ear protection for all cutting operations.
Mark the cut line on the stone with a pencil or chalk. For a straight cut, use a combination square or straight edge. For an angled or compound cut, mark directly from the space to be filled.
Score along the cut line first with the blade at moderate speed before cutting through fully. A scored line guides the blade and reduces the risk of the stone splitting unpredictably.
Cut from the face side for natural stone — this produces a cleaner edge on the visible surface. The break and any roughness is on the underside, which is bedded in mortar.
Tidy cut edges with the disc or with a cold chisel and lump hammer for any remaining ragged sections.
For very occasional cuts on a path where most stones are laid whole, a hired disc cutter is more practical than an angle grinder — it produces cleaner, more controlled cuts in a single pass.
Step 7: Allow the Mortar Bed to Cure
After laying, leave the stones undisturbed for at least 24 hours before walking on them and at least 48–72 hours before any wheeled load.
In cold weather (below 5°C), curing slows significantly — avoid pointing until temperatures are reliably above 5°C, and protect newly laid work from frost with insulating fleece for the first 48 hours.
In hot dry weather, lightly mist the surface with water during curing to prevent the mortar from drying too quickly, which can cause surface cracking and weakened bond strength.
Step 8: Point the Joints
Pointing fills the joints between stones, locks them in position, and prevents weed growth and water penetration at the joints.
Timing. Allow at least 24 hours after laying before pointing — you want the bedding mortar to have taken before you disturb the edges of the stones with pointing work. Most pointing is done 24–72 hours after laying.
Conventional mortar pointing uses the same 1:5 or 1:6 mix as the bedding, applied at a consistency that can be worked into the joint with a pointing trowel. Press the mortar firmly into the joint, compact it slightly below the surface of the stones, and finish with a pointing trowel to create a slightly recessed, neat joint.
Work in small sections and clean mortar off the stone surface promptly — mortar that dries on the stone surface is much harder to remove and can stain. Keep a damp sponge or cloth to hand.
Brush-in pointing compound (such as Rompox or Gftk proprietary products) is an alternative that can be swept over the surface in dry form and then lightly compacted into the joints. It is quicker and easier than conventional pointing and produces a reliable result, but it is more expensive and works best in joints of consistent width.
Allow pointing to cure for at least 24–48 hours before rain or foot traffic.

Step 9: Clean and Seal
Clean the surface after the pointing has cured. Any mortar smears on the stone surface can be removed with a stiff brush and water while relatively fresh. Dried mortar may require a diluted brick acid (hydrochloric acid) solution — follow the manufacturer’s instructions and neutralise fully with water after application. Test on a hidden area first.
Sealing protects natural stone from staining, frost damage, and biological growth (moss and algae). A quality stone sealer — impregnating rather than surface-coating — should be applied to a clean, dry surface. Most natural sandstone and limestone paths benefit from sealing within the first few weeks of completion, before they are exposed to significant organic staining.
Re-sealing every 3–5 years maintains the protective layer, depending on traffic and weather exposure.
Common Mistakes to Avoid
Insufficient excavation depth. The sub-base needs to be at least 100mm deep. Compromising on this means the path will move.
Inadequate compaction. Hiring the plate compactor and using it properly is not optional — hand tamping is insufficient.
Wet mortar mix. A sloppy mortar bed is difficult to work with and produces a weaker bond. The semi-dry mix holds firm and allows proper adjustment.
Skipping the weed membrane. Weeds will find their way through any gap, and removing established weeds from beneath stone is considerably harder than laying the membrane before the sub-base.
Grouting too soon. Pointing before the bedding mortar has cured risks disturbing the stone position. Wait at least 24 hours.
Not checking level and fall continuously. Small errors compound. Check every two or three stones and correct promptly.
A well-laid stone path, built on a proper sub-base with good mortar work, will still be in service in twenty years with nothing more than occasional cleaning and re-sealing. The hardscaping preparation is the investment — the laying is the reward.