The Ultimate Guide to a 3 Point Post Hole Digger
A 3 point post hole digger — also called a 3 point hitch auger or tractor-mounted post hole digger — is one of the most productive pieces of equipment you can add to a tractor. What takes a person with a manual or petrol-driven hand auger an hour can take a tractor-mounted auger a few minutes. For anyone installing fence posts, planting trees, setting deck posts, or drilling holes for any structural purpose across a significant area of land, the difference in productivity is not incremental — it is transformative.
This guide covers everything you need to know: how 3 point post hole diggers work, how to choose the right one, how to match auger size to the job, how to attach and operate them safely, and how to keep them running well.
What Is a 3 Point Post Hole Digger?
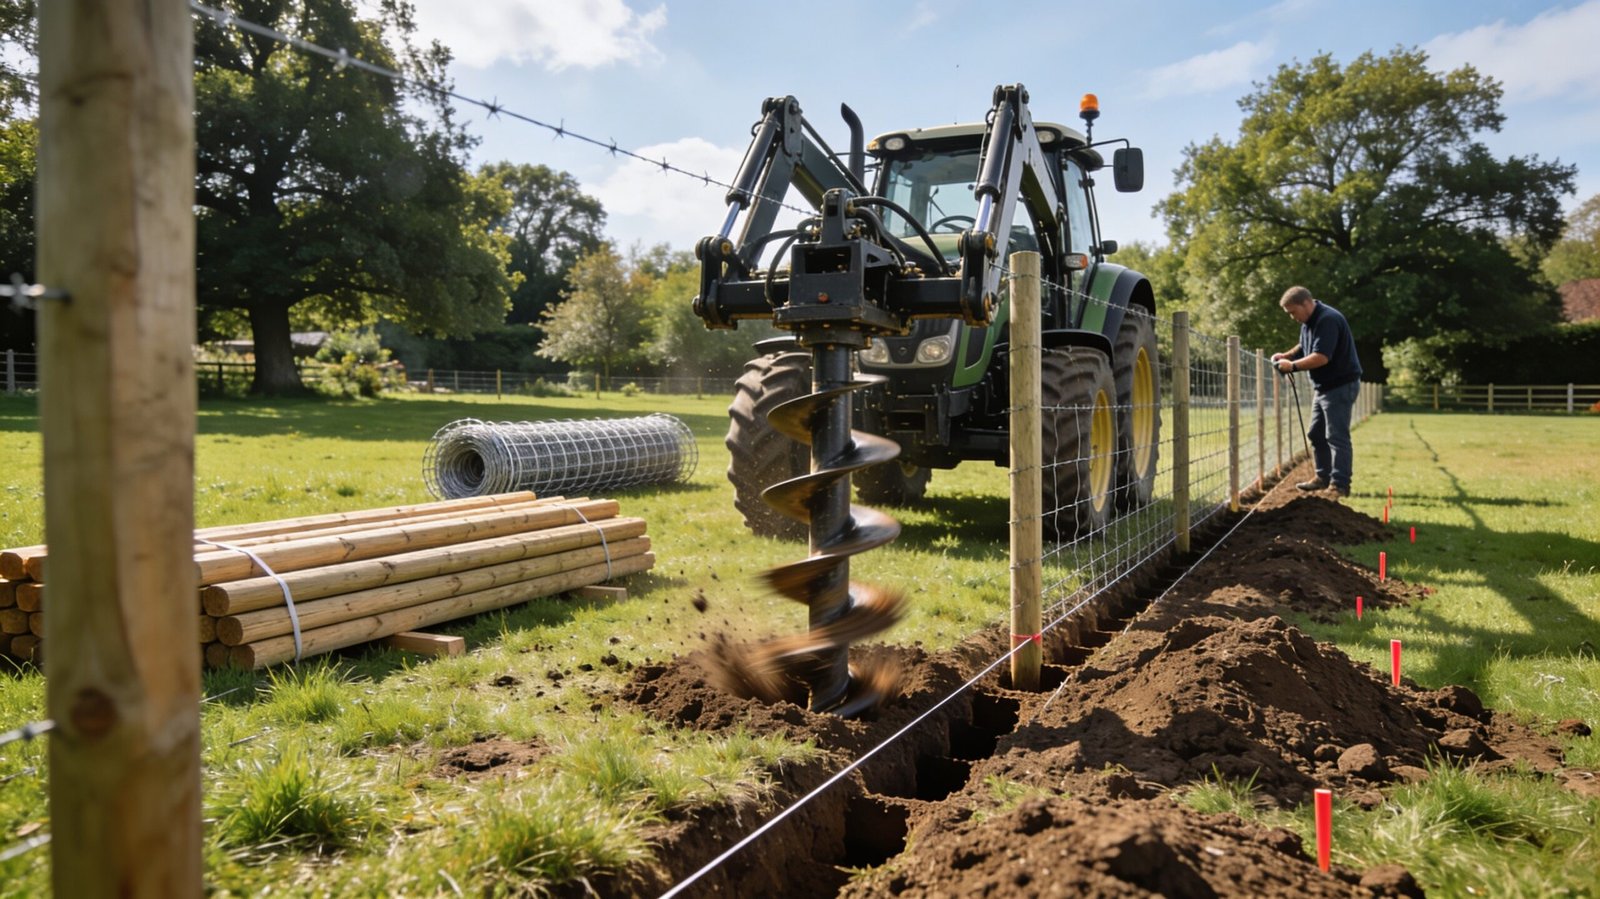
A 3 point post hole digger is a tractor-mounted implement that uses the tractor’s three-point hitch and power take-off (PTO) to drive a rotating auger into the ground, boring a clean cylindrical hole to a specified depth and diameter.
Three-point hitch (3PH): The three-point hitch is the standard hydraulic linkage system on the rear of most tractors, consisting of two lower lift arms and one upper link. It provides mounting, lifting, and lowering capability for implements. Post hole diggers are designed to mount to the Category 1 or Category 2 three-point hitch, depending on the size of the tractor.
Power take-off (PTO): The PTO is a rotating shaft at the rear of the tractor that transfers power from the tractor’s engine to the implement. Most tractors run PTO at 540 rpm (some offer 1000 rpm for larger equipment). The post hole digger’s gearbox is driven by the PTO shaft through a universal joint driveshaft.
The auger: The auger is the spiral-bladed drilling bit that bores the hole. It consists of a central shaft with helical flighting (the spiral blade) and a point or teeth at the bottom. As it rotates, the flighting moves excavated material up and out of the hole.
How a 3 Point Post Hole Digger Works
When the tractor’s PTO is engaged, it drives the gearbox on the digger, which in turn rotates the auger at a much slower speed than the PTO input (typically 150–200 rpm at the auger, geared down from 540 rpm PTO input). The gearbox provides the torque multiplication needed to drive the auger through soil.
With the auger positioned over the target location, the operator uses the tractor’s three-point hitch hydraulics to lower the digger, pressing the auger into the ground. The auger drills downward as the flighting carries spoil to the surface. When the desired depth is reached, the three-point hitch raises the digger, withdrawing the auger from the hole.
A reversing function (where available) rotates the auger in the opposite direction to free it if it becomes stuck — this is a valuable feature in clay or rocky soils where binding can occur.
Choosing the Right 3 Point Post Hole Digger
Tractor Compatibility: Category and PTO Horsepower
The most important compatibility question is whether the post hole digger matches your tractor’s three-point hitch category and PTO horsepower rating.
Three-point hitch categories:
- Category 1: For tractors from approximately 20–50 PTO hp. Lower link pin diameter 19mm (¾”). Most compact and sub-compact tractors use Category 1 hitches.
- Category 2: For tractors from approximately 40–120 PTO hp. Lower link pin diameter 28mm (1⅛”). Standard on larger agricultural tractors.
Most post hole diggers specify a PTO horsepower range (e.g. 15–35 PTO hp, or 35–65 PTO hp). Match this to your tractor’s rated PTO horsepower — undersized equipment will be overloaded in heavy ground; oversized equipment will not perform efficiently on a small tractor.
PTO speed: Confirm whether your tractor’s PTO runs at 540 rpm or 1000 rpm, and match the implement to the correct input speed. Running a 540 rpm implement on a 1000 rpm PTO will cause serious mechanical damage.
Auger Diameter
Auger diameter is specified to match the post or purpose:
| Auger diameter | Typical applications |
|---|---|
| 6″ (150mm) | Thin fence posts, plant stakes, small trees |
| 9″ (230mm) | Standard fence posts (round or square), small trees |
| 12″ (300mm) | Larger fence posts, medium trees, deck posts |
| 16″ (400mm) | Large structural posts, mature tree planting |
| 18–24″ (450–600mm) | Large diameter planting pits, structural foundations |
For most agricultural fencing applications — post-and-rail, stock fencing, electric fence systems — a 9″ auger is the standard choice. For heavier strainer posts or H-braces, a 12″ auger provides more clearance around the post.
Most 3 point post hole diggers are sold with one auger and allow additional augers to be purchased and interchanged. Check that the auger attachment mechanism (typically a hex drive or a proprietary pin system) is compatible with the replacement augers you intend to add.
Auger Length and Depth Capacity
Standard augers are typically 36″–42″ (900–1050mm) in working length, giving a maximum hole depth of approximately 36″ (900mm). Extension auger sections — additional shaft and flighting that bolt between the auger and gearbox — allow greater depth. Extensions are available in 12″, 18″, and 24″ lengths.
For agricultural fencing, holes of 24″–36″ depth are standard. For structural posts subject to significant load, deeper holes (36″–48″) provide better anchorage.
Gearbox: The Critical Component
The gearbox converts 540 rpm PTO input to the slower, high-torque output needed to drive the auger. It is the most stressed and most failure-prone component in a post hole digger, and gearbox quality is the primary differentiator between budget and quality implements.
Shear bolt protection: Quality gearboxes incorporate a shear bolt or shear pin that sacrifices itself when the auger strikes an immovable obstruction (rock, tree root, hardpan), protecting the gearbox internals from damage. Always carry spare shear bolts. A shear pin failure is an inconvenience; a gearbox failure from not having shear bolt protection is an expensive repair.
Gearbox housing: Cast iron or heavy steel housings are more durable than fabricated thin-gauge steel. The weight of the gearbox is usually a reasonable indicator of its robustness.
Oil: Most gearboxes require periodic oil level checks. Check the oil before each season of use and replace as specified in the manufacturer’s manual. Running a low-oil gearbox is the most common cause of premature gearbox failure.
Attachment and Setup
Attaching to the Three-Point Hitch
- Position the tractor with the three-point hitch arms at a height slightly above the digger’s lower attachment points. Reverse slowly until the lower link pins align with the lower hitch eyes on the digger.
- Secure the lower links with the linch pins or hitch pins through the lower link pin and the implement eye. Ensure both sides are secured.
- Connect the top link from the tractor’s upper link to the top bracket on the digger. Adjust the top link length so the gearbox is approximately level (the auger should be vertical when the implement is in the working position).
- Connect the PTO driveshaft by aligning the PTO yoke with the tractor’s PTO stub shaft and pushing to engage. Check that the driveshaft safety shield is intact and undamaged. The driveshaft must telescope freely without binding throughout the range of hitch movement — check by raising and lowering the hitch with the PTO disconnected.
- Check stabiliser chains or stabiliser bars are set to limit lateral swing of the implement during transport. Excessive lateral swing during transport can cause the auger to contact the tractor tyres.
Levelling and Positioning
The auger must be vertical when drilling, or the hole will be angled. Adjust the top link to achieve this. In operation, the tractor must be positioned precisely so the auger centres over the target hole location — there is no mechanism to shift the auger laterally on most basic 3 point diggers. Premium models may offer a hydraulic offset or lateral shift for greater positioning flexibility.
Safe Operation
Post hole diggers are among the most dangerous implements for entanglement injury. The rotating PTO driveshaft and the rotating auger are both severe entanglement hazards. The following safety practices are not optional:
PTO driveshaft guard: The driveshaft safety guard (a plastic or metal shield that covers the rotating shaft) must be in place and must be secured to a non-rotating part. If the guard is missing, damaged, or not properly anchored, it rotates with the shaft and provides no protection. Do not operate without a properly secured guard.
Never wear loose clothing near a rotating PTO or auger. Loose trouser legs, jacket sleeves, scarves, and similar items can be caught in a fraction of a second. Roll up or secure loose clothing before operating.
Do not step over a rotating PTO driveshaft. This is the most common mechanism of serious entanglement injury.
Stay clear of the auger during operation. The auger should be considered an exclusion zone for anyone other than the tractor operator.
Disengage the PTO before dismounting the tractor for any reason — including to clear a jammed auger. The auger must be fully stopped before approaching it. A jammed auger that breaks free unexpectedly will rotate violently.
Underground service check: Before drilling any hole, confirm the location of underground services — water pipes, gas pipes, electricity cables, fibre or data cables, drainage. The 811 system (USA) or equivalent local notification scheme provides service locations before excavation. In the UK, contact Dial Before You Dig services or LSBUD (Lines and Structures Before You Dig). Striking a buried service with an auger can cause serious injury and significant infrastructure damage.
Sloping ground: Extra caution is required when operating on slopes. The tendency for the auger to torque-react — twist the tractor in the opposite direction to auger rotation — increases on slopes. Compact tractors with narrow wheelbases are particularly susceptible.
Operation: Drilling the Hole
- Position the tractor with the auger centred over the target location. Mark holes with stakes in advance for efficiency.
- Lower the auger to just above ground level using the three-point hitch hydraulics.
- Engage the PTO at low throttle and confirm the auger is rotating in the correct direction (clockwise viewed from above).
- Lower slowly into the ground. The auger will begin to penetrate — do not force downward pressure faster than the auger can efficiently evacuate spoil. In most soils, the weight of the implement provides adequate downward force.
- Allow spoil to clear. Every 12–18″ of depth, raise the auger partially out of the hole to allow the spiral flighting to clear accumulated spoil from the hole. In sticky soils this is particularly important — clogged flighting loses cutting efficiency and increases the load on the gearbox.
- Maintain steady throttle and avoid sudden changes in engine speed while the auger is under load.
- At target depth, raise the auger cleanly from the hole. Spoil deposits on the surface can be raked back or left as a berm around the hole for later backfilling.
- Disengage the PTO before driving to the next location.
Dealing with Obstructions
Rocks and tree roots are the most common obstructions. When the auger encounters a rock:
- Ease off downward pressure
- Attempt to rotate past or around the obstruction
- If the auger stops rotating and the shear bolt has not activated, disengage the PTO and investigate — do not force a stalled auger with increased throttle
- If the shear bolt has sheared, replace it with the correct specified replacement. Never substitute a harder bolt — the shear bolt is designed to fail before the gearbox does
Maintenance
After each use:
- Remove soil and debris from the auger flighting with a stiff brush or water
- Check the auger point and cutting teeth for wear or damage — worn teeth dramatically reduce drilling efficiency and increase load
- Inspect the PTO driveshaft, universal joints, and guard for wear or damage
- Check all pins, bolts, and linch pins
Each season:
- Check and top up gearbox oil to the correct level using the specified oil grade
- Grease all grease nipples on universal joints and pivot points
- Check flighting for cracks, particularly at the welds to the central shaft
- Replace worn auger teeth — replacement tooth kits are available for most auger brands
Auger teeth: Replaceable carbide or hardened steel teeth on the auger point are the primary wear item. When they wear, drilling becomes harder and slower. Replacement teeth are inexpensive relative to the time and gearbox stress of drilling with worn cutters.
Common Problems and Solutions
Auger binding and won’t come out: Engage reverse rotation if available. Otherwise, rock the three-point hitch up and down gently while rotating — the vertical movement can break the soil’s grip. Do not apply excessive upward force with the hydraulics while the auger is spinning — this can damage the lower link pins.
Hole sides collapsing: In sandy or loose soils, hole sides may collapse after drilling. Consider pre-wetting the soil (drilling after rain improves hole quality in most soil types), working quickly to place the post before collapse, or lining the hole temporarily.
Poor penetration in hard ground: Check that auger teeth are not worn. In very hard or compacted ground, pre-wetting with water can improve penetration significantly. Very hard clay or cemented subsoil may require heavier equipment or a rock auger with more aggressive cutting teeth.
Gearbox overheating: Most commonly caused by running at excessive speed in very hard ground, or by low oil level. Check the oil, reduce working pace, and allow the gearbox to cool before continuing.
A well-maintained 3 point post hole digger, matched to the right tractor and the right auger for the job, will last many years and cover thousands of holes. The investment in the right equipment — and the discipline to operate and maintain it correctly — pays back in productivity every time you drive the next fence post.