You step into the basement and feel the cool, damp air settle around you as design choices unfold beneath the house. You’ll balance moisture control, ventilation, and insulation from the start, mapping a layout that respects code and safety while still letting light seep in. With careful budgeting and phased milestones, you’ll uncover the right sequence of tasks—plumbing, electrical, HVAC—so you can keep working toward a durable, comfortable space that rewards steady, purposeful progress.
Identify Moisture Risks and Ventilation Needs Up Front

Identifying moisture risks and ventilation needs upfront is essential to prevent long-term structural damage and guarantee comfortable, healthy living spaces. You start by mapping exterior water flow, soil moisture, and historical damp spots. Then translate findings into a ventilation plan that aligns with the cellar’s layout.
Prioritize continuous airflow through balanced intake and exhaust, avoiding stagnant zones where mold can thrive. Implement moisture barriers at potential ingress points, including walls, floors, and joints, to minimize capillary rise and condensation.
Integrate humidity sensors to monitor real-time conditions and trigger proactive adjustments before problems escalate. Pair barriers with a targeted dehumidification strategy for peak humidity periods.
Design discreet, serviceable vent paths that maintain room aesthetics. This upfront, data-driven approach informs every subsequent design choice, ensuring durable performance and occupant comfort.
Understand Building Codes and Permitting Basics
What building codes and permitting steps apply to converting a cellar into living space, and how do you navigate them efficiently? You assess local requirements by researching the current code cycle, identifying essential provisions for egress, habitable height, and moisture control, and aligning design decisions with enforceable standards.
Begin with a documented plan set that clearly marks means of egress, lighting, ventilation, and fire protection, then submit through the permit office with accurate floor plans and specs. Track review timelines, respond to plan-check comments promptly, and verify inspections meet compliance before occupancy.
Focus on integration of structure, energy efficiency, and safety to prevent costly changes later.
- building permits
- zoning regulations
- code-compliant design parameters
Create a Realistic Budget for a Basement Remodel
Creating a realistic basement-remodel budget starts with a precise scope and a contingencies plan, then translates those decisions into line-item costs you can track. You’ll map each task to measurable units—square footage, hours, or materials—and assign conservative prices to prevent shortfalls.
Focus on budget planning by separating hard costs (structural, systems, finishings) from soft costs (permits, design fees, inspections). Build a baseline estimate using current market data, then add a practical contingency, typically 10–20%, for unknowns and changes in scope.
Track overruns with weekly checks and variance reports, adjusting timelines as needed. Prioritize cost estimation accuracy in the early phase to prevent rework later.
Document assumptions, supplier lead times, and delivery windows, so you can justify deviations and maintain project momentum. Avoid rushing decisions; review each line item for necessity and value.
Decide Your Basement’s Primary Functions

First, identify your primary uses—entertainment, work, or quiet living—so you can prioritize layout and materials.
Next, assess space constraints like ceiling height, egress, and moisture, ensuring your plan fits safety and comfort needs.
Finally, map your utility needs early on, outlining where HVAC, electrical, and plumbing will run to support each function.
Define Primary Uses
Defining your basement’s primary uses sets the design direction and budget priorities, so start by listing must-haves (like a bedroom, home office, or gym) and nice-to-haves (such as a kitchenette or additional storage). This framing guides space planning, finishes, and systems decisions, ensuring you allocate priorities where they matter most.
You’ll balance functional zones with future-proofing, factoring traffic flow, acoustics, and lighting as core constraints.
Historical preservation and aesthetic enhancement should steer design language, selecting materials that respect history while delivering modern performance.
Clarify target occupancy, privacy needs, and access points to minimize costly retrofits later. Your verdict shapes scope, cost envelopes, and project phasing, giving you measurable milestones to track progress.
- Must-haves versus nice-to-haves
- Functional zoning and future-proofing
- Preservation-informed aesthetics
Assess Space Constraints
Evaluating space constraints begins with translating your prioritized uses into tangible layout requirements. You’ll map each function to a minimum footprint, then test compatibility with doorways, stairs, and egress paths.
Start by sizing zones: living, storage, and workspace, noting ceiling height, column locations, and structural elements that limit furniture placement. Consider traffic flow: you want clear, continuous paths that don’t disrupt functional cores.
Measure radii for seating, equipment, and movement, then sketch scale diagrams to compare options. Assess acoustics and light—these influence furniture placement and decorative accents without overloading the room.
Prioritize flexibility: opt for modular furniture and convertible surfaces that adapt to changing needs. Document constraints in a concise grid, guiding subsequent decisions on finishes, lighting, and occupancy limits.
Plan Utility Needs
How will you determine your basement’s backbone functions to guide layout and finishes? You’ll map utility needs to support primary uses, then align daylight, ventilation, and moisture control with those aims.
Start by prioritizing zones: living, storage, and utility workflows, ensuring electrical, plumbing, and HVAC can support each area without cross‑contamination or noise transfer.
Consider future needs, like basement gardening and artwork display, and plan dedicated circuits, climate control, and lighting layers accordingly.
Design with scalable components—removable walls, modular cabinetry, and adjustable lighting—so you can reconfigure as your functions evolve.
Finally, audit moisture management and radiant heat compatibility to protect finishes and equipment.
- basement gardening
- artwork display
- future-proofed layouts
Design a Climate-Controlled, Code-Compliant Layout
You’ll start by evaluating humidity levels and ventilation needs to maintain comfort without mold risk, aligning fans, dehumidifiers, and air gaps with the space’s layout.
Next, you’ll map egress routes and safety code requirements early, ensuring stairs, exits, and window openings meet minimum dimensions and accessibility standards.
Finally, you’ll select insulation, drafts control, and mechanical placements that minimize heat loss while keeping utility runs efficient and compliant.
Humidity and Ventilation
You approach this analytically, quantifying humidity ranges, leakage paths, and ventilation needs. You’ll select components that harmonize with the space’s volume, insulation, and anticipated occupancy, prioritizing reliability and ease maintenance.
Focus on integrated controls, ensuring consistent dew point management and thermal comfort. Your plan includes careful humidifier selection and properly designed ventilation systems to meet code while minimizing energy waste.
Detail-oriented decisions reduce callbacks and reassure occupants that the cellar remains healthy, dry, and pleasant year-round.
- Humidifier selection
- Ventilation systems
- Integrated controls
Egress and Safety Codes
Analyze occupant density to determine required egress capacity, while integrating egress doors with pressure-rated hardware and panic hardware where needed. Design fire separation, sprinkler zoning, and smoke barriers to minimize interconnected risk without compromising utility rooms.
Confirm carbon-monoxide detection is interlinked with ventilation actuation and nuisance controls. Consider basement acoustics and decorative accents when locating mechanical rooms to preserve performance and aesthetics, avoiding conflict between safety equipment placement and finished spaces.
Insulation and Drafts Control
- Optimize airtight details around windows and doors for consistent comfort
- Select continuous insulation and vapor barrier placement to deter condensation
- Harmonize finishes with color schemes that reflect daylight and reduce heat gain
Address Moisture Control: Waterproofing and Drainage
To effectively address moisture control when converting a cellar, start with a precise assessment of both waterproofing and drainage needs, then implement a layered, design-forward solution. You’ll map moisture pathways, identify capillary rise risks, and compare interior versus exterior strategies to minimize disruption.
Prioritize a continuous waterproof membrane, proper sump configuration, and controllable drainage routes that direct water away from the envelope and foundation.
Detail-oriented detailing matters: sub-slab drains, cracked-wall sealants, and vapor barriers integrated with finishes to prevent hidden leaks.
Balance technical confidence with aesthetics by selecting basement aesthetics‑friendly materials and coordinating with decorative accents that conceal moisture-control components while maintaining accessibility for maintenance.
Your method should be measurable, durable, and scalable, ensuring long-term dryness without compromising design integrity.
Choose Insulation and Thermal Barriers That Last

You’ll compare insulation material choices for storage-laden spaces, weighing thermal performance against moisture tolerance and install practicality.
Consider how thermal barriers withstand long-term humidity, temperature swings, and air movement, with durability-backed ratings guiding every layer.
This starter examines moisture control strategies that integrate with chosen insulation to guarantee lasting comfort and energy efficiency.
Insulation Material Choices
Choosing insulation and thermal barriers that endure starts with evaluating material fundamentals, performance data, and installation constraints to prevent heat loss, moisture intrusion, and fire risks in a cellar conversion.
You’ll weigh R-values, vapor retarders, and panel formats, then align with existing framing and humid conditions to minimize pathways for moisture and heat exchange.
Prioritize durable assemblies that resist compression, mold, and seasonal shifts, while keeping install ease in mind to avoid gaps and cold spots.
Insulation material choices should balance high performance with long-term stability, ensuring consistent temperature, energy savings, and safe occupancy.
Moisture risks demand thoughtful moisture-control strategies embedded in the assembly, not retrofitted afterward.
- Material durability and compatibility checks
- Moisture-control integration within assemblies
- Installation sequencing that minimizes gaps
Thermal Barrier Longevity
Favor continuous, well-sealed assemblies over gaps that invite convection paths, and choose zugzwang-free fasteners and compatible sheathing to reduce perforations. You assess moisture resistance, ensuring barrier components tolerate incidental dampness without compromising structure or air tightness.
Design intent matters: align barrier choices with the cellar’s climate, load demands, and retrofit constraints, then verify with practical testing standards. In practice, you document material compatibility, installation tolerances, and anticipated service life, establishing a measurable target for thermal barrier longevity and a clear path for maintenance.
Moisture Control Strategies
Moisture control hinges on selecting insulation and barriers that tolerate dampness, humidity swings, and incidental leaks without compromising performance. You’ll compare material properties for durability, vapor permeability, and mold resistance, then align them with basement aesthetics and long-term upkeep.
Prioritize assemblies that maintain temperature, manage condensation, and resist moisture migration, while preserving layout flexibility for Decorative accents. Design decisions should balance cost, install time, and future accessibility, ensuring you can service leaks without removing finished surfaces.
Choose breathable exterior wraps with proper flashing and a concealed drainage plan to avert hidden damp. Integrate moisture monitors and a simple dehumidification strategy to sustain stability.
Plan for future renovations by selecting modular components that keep Basement aesthetics coherent.
- Consistent vapor management
- Durable, stain-resistant finishes
- Accessible inspection points
Stabilize Subfloor for Dry, Warm Floors
To stabilize the subfloor for dry, warm floors, identify and address moisture sources before addressing structure. You’ll map every ingress point, then implement precise corrections that don’t compromise future finishes.
Begin with a rigorous subfloor preparation plan: remove debris, test for soft spots, and level irregularities, documenting tolerances for driving inspection approvals.
Next, select moisture barriers that suit your climate, opting for vapor-retardant underlains and breathable membranes where appropriate. Install barriers consistently, overlapping seams and sealing edges to prevent capillary rise.
Pair barriers with a rigid or floating subfloor system that retains warmth and resists damp intrusion. Maintain a clear boundary between moisture control measures and finished flooring, ensuring warranties align with your design goals.
This disciplined sequence yields stable, comfortable, and energy-efficient living space, minimizing long-term repairs.
Ensure Safe Egress and Lighting
You’ll start by aligning egress design with code requirements, ensuring unobstructed paths, adequate doorway widths, and proper height clearances for safe exit under stress.
Plan lighting with layered strategies—ambient, task, and escape modes—so every route remains visible during outages and daily use.
Focus on reliability and durability of fixtures, prioritizing low-glare, shadow-minimizing placement that supports quick, calm navigation in a finished basement.
Safe Egress Codes
Safe egress and lighting are non-negotiables in converting a cellar into livable space: you must guarantee all exits are unobstructed, properly sized, and clearly illuminated, with emergency lighting that activates automatically during power outages.
You evaluate codes against space layout, ensuring egress windows meet minimum clear opening areas and staircase headroom, while maintaining unobstructed paths. Your approach balances safety with design intent, prioritizing durable finishes and moisture control to support basement decor.
You plan to document compliance, test alarms, and verify stair dimensions, then translate requirements into practical details, such as void-free landings and weather-tight connections. Waterproof paint and effective drainage support long-term reliability, reducing risk of failed egress components.
- Verify exit clarity and dimensions during design reviews
- Align lighting power and battery backup with code thresholds
- Integrate moisture management for durable egress components
Lighting Plan Essentials
In practice, map zones for task lighting and ambient layers, then pair fixtures with wall colors and ceiling heights to avoid glare. Use dimmable LEDs to adjust mood without compromising safety, and place emergency lighting along all egress routes to meet code thresholds.
Consider decorative accents that don’t obstruct paths, ensuring they complement rather than compete with primary lighting. Integrate furniture arrangements to maximize floor clearance and sightlines, reducing dark pockets.
Document lumen levels for each zone and review periodically to preserve consistent spatial readability and safe navigation.
Plan Soundproofing for Private Living Areas
Soundproofing private living areas starts with a precise assessment of noise sources and structural pathways. You map impact, airborne, and mechanical noise, then identify flanking routes through walls, floors, and doors.
Next, you select targeted strategies that balance performance, cost, and comfort, with a focus on integration into your cellar’s layout and finishes. Use a layered approach: decouple, absorb, and seal without creating bulky bulk or compromised egress.
Plan around core zones—sleep, study, and lounge—to optimize privacy and acoustical consistency. Consider enhancement hardware and materials that support long-term stability and ease of maintenance.
- Soundproofing materials
- Privacy partitions
- Door and window detailing
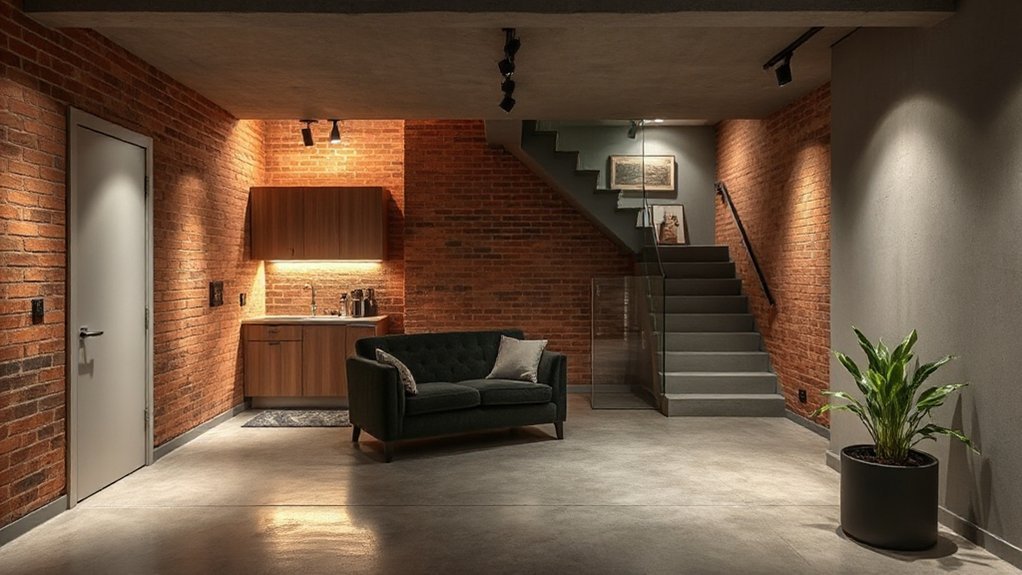
Select Durable, Aesthetic Basement Finishes
You’ll compare durable material choices—like moisture-resistant gypsum, cement board, and vinyl-coated panels—to balance longevity with maintenance needs.
Then you’ll map aesthetic finishes, from color and texture to light reflectance, to guarantee a cohesive, design-forward basement mood.
Finally, you’ll outline surface installation tips that minimize flaws, maximize adhesion, and support long-term performance.
Durable Material Choices
Durable, aesthetic basement finishes hinge on materials that resist moisture and wear while delivering cohesive, low-maintenance appeal. You choose substrates that handle humidity, then layer finishes that stay stable over years. Prioritize closed-cell or sealed systems, and test for off-gassing and mold resistance to guarantee long-term integrity.
You’ll weigh installation ease, resilience, and compatibility with existing structures, balancing cost with performance.
- Decorative flooring options that resist dampness and scuffs while enhancing flow
- Color schemes that maintain tone without showing wear or water stains
- Seamless wall and ceiling panels that simplify maintenance and reduce joints
This approach emphasizes measurable performance, predictable upkeep, and integrated aesthetics, enabling a durable space that supports daily living while preserving design intent.
Aesthetic Finishes Guide
What finishes best balance durability and appeal in a basement setting, and how can you choose materials that resist moisture while maintaining a refined, cohesive look? You’ll evaluate understated textures and sealants that pair with structural moisture management.
Prioritize low-porosity surfaces, such as high-pressure laminates, ceramic or porcelain tiles, and moisture-rated paints with mildew resistance. Favor matte to satin sheens that minimize glare while masking imperfections.
For durability, select reinforced cement panels or gypsum boards with water-resistant coatings, and integrate fiberglass-reinforced polymers where movement occurs.
Color palettes should stay cohesive across walls, ceilings, and trim, with accent hues confined to accents rather than large fields. Introduce artistic accents through tactile materials and subtle patterns, ensuring the finish system remains low-maintenance and visually calm.
Surface Installation Tips
Even before selecting materials, assess your basement’s moisture profile and framing—these factors drive fastening methods, substrate preparation, and long-term performance.
When you approach surface installation, prioritize surface preparation and precise material selection to guarantee durability and aesthetics align with function. You’ll evaluate substrate flatness, humidity, and potential vapor ingress, then choose finishes that tolerate basement conditions while delivering a refined look.
Installers should pre-clean, patch, and seal irregularities before laying any layer, preventing telegraphed imperfections. Coordinate edge detailing, shift, and acclimation times to reduce shrinkage or warping.
Select finishes with compatible backing and minimal VOCs to maintain air quality in tight spaces.
- Assess moisture, framing, and substrate prep upfront
- Compare finish systems for compatibility and durability
- Plan acclimation, edging, and shift meticulously
Pick a Heating, Ventilation, and Air-Quality Strategy
Choosing a heating, ventilation, and air-quality (HVAC) strategy for a converted cellar hinges on evaluating moisture control, insulation performance, and air exchange needs. You’ll balance dehumidification with comfort, selecting systems that don’t create drafts or noise.
Start with a robust vapor barrier at the perimeter and continuous insulation to minimize condensation risk.
For air handling, prioritize controlled ventilation that meets ASHRAE-like targets without over-pressurizing the space. Consider heat-recovery options to preserve energy while maintaining air quality.
Smart thermostats help you fine-tune humidity setpoints and occupancy patterns, reducing cycles and costs.
Pair thermostats with a quiet, high-efficiency fan coil or ductless mini-split for zone control.
Document commissioning data for temperature, humidity, and filtration efficiency to guarantee durable, comfortable living conditions.
Install Electrical and Plumbing With Room to Grow
From the groundwork laid by solid HVAC planning, you’ll now map electrical and plumbing layouts with room to grow in mind. You’ll design circuits and feed points that power future spaces without overloading panels, and place outlets for furniture layouts to minimize extension cords.
Plan plumbing fixtures with scalable connections, allowing additional bathrooms or wet bars without costly rework. Prioritize electrical safety by locating GFCI near water sources, using proper conduit, and labeling panels clearly.
Integrate water efficiency and potential future expansions into pipe routing, preserving drop ceilings or chase spaces for easier upgrades. Balance aesthetics with access for maintenance, ensuring clean runs and service loops.
- Future-ready circuits and outlets
- Safe, labeled electrical paths
- Flexible plumbing routes and fixture placement
Optimize Ceiling Height and Hidden Cabling

Optimizing ceiling height and hidden cabling starts with a clear plan: choose ceiling heights that balance spacious feel with practical HVAC and structural limits. Then route cables through concealed paths that minimize visible clutter. You’ll assess lowest viable soffit placements, structural beams, and mechanical risers to preserve headroom while meeting code.
Prioritize uniform ceiling heights where possible to reduce visual heaviness and simplify finishes. For Hidden cabling, map routes behind soundproofed soffits, chase walls, or drop ceilings, and specify trunking with durable finishes. Label all runs at junctions and cap cleanly to avoid future digging.
Specify service loops in accessible panels to ease maintenance without breaking aesthetics. Finally, verify access to gravity-fed drains and sump discharges, ensuring integration doesn’t compromise ceiling height or concealment. Ceiling height considerations and hidden cabling choices drive long-term livability.
Create Zoning: Living Area, Sleep Space, and Utility
Reconfiguring a cellar into distinct zones starts with a clear layout that supports flow, function, and privacy. You’ll define a living area, a compact sleep space, and a utility corner so each zone earns purpose without encroaching on another. Use sightlines, partial partitions, and level changes to maintain openness while signaling boundaries.
Prioritize durable surfaces and moisture resistance, pairing them with strategic lighting to enhance mood and usability. Consider subtle carpeted zones for warmth in the sleeping area and vinyl or tile where utility tasks occur. Integrate built-ins and storage to keep clutter out of sight.
Baseline decisions hinge on Basement lighting, Flooring options, and ventilation for comfort across zones.
- Zone boundaries that preserve sightlines
- Material choices balancing comfort and moisture
- Storage-driven layout optimization
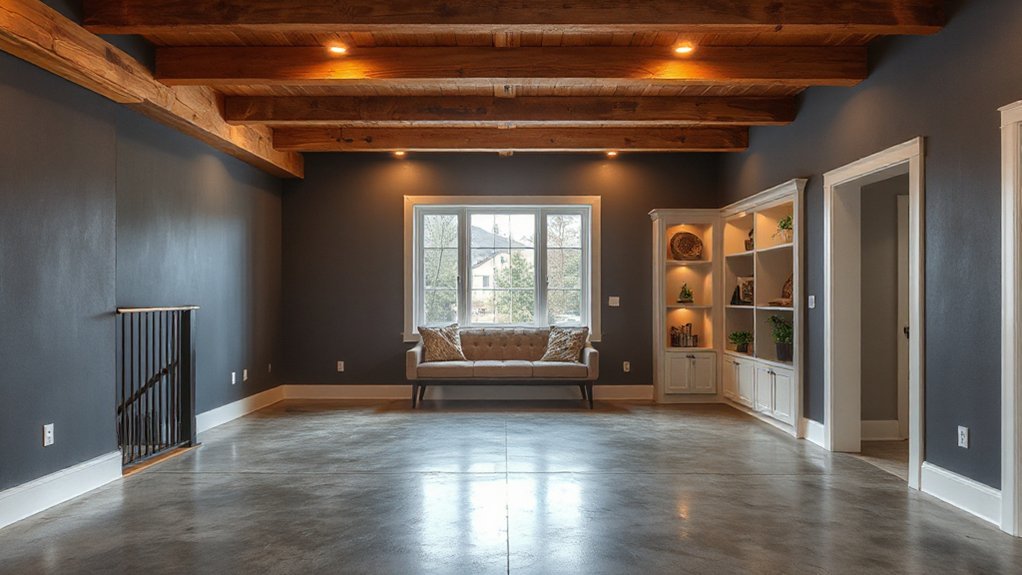
Lighting Plans to Make the Space Feel Larger
Strategically placed lighting can visually expand a cellar by layering brightness and eliminating deep shadows; you should plan a mix of ambient, task, and accent fixtures that work with the existing zones.
In practice, outline a grid of ceiling and wall luminaires to create even baseline illumination, then add task light at reading nooks and work surfaces. Use dimmers to modulate intensity and avoid glare on low ceilings.
Reflective finishes, pale walls, and frosted panels amplify light without increasing fixtures. Incorporate cove or under-cabinet lighting to soften shadows along gradual shifts between zones.
Consider garden landscaping and outdoor lighting cues to extend perceived space beyond the interior, subtly guiding perception toward exterior form.
Guarantee compatibility with moisture barriers and energy-efficient LED options for consistent brightness.
Storage Solutions Tailored to Small Basements
When space is at a premium, smart storage in a small basement hinges on deliberate zoning, vertical utilization, and accessible organization. You’ll map zones for routinely used items, seasonal gear, and infrequently accessed objects, minimizing cross-traffic and visual clutter.
Harness built-ins, wall-mounted cabinets, and shallow shelving to keep floor area open, while maximizing edge-to-edge storage. Prioritize modular solutions that adapt to evolving needs, with clear labeling and uniform hardware to improve storage organization.
Think decorative accents integrated with function—slender benches with hidden bins or decorative boxes that align with the room’s palette. Use ceiling compartments or under-stair nooks to reclaim vertical space without sacrificing aesthetics or airflow.
- Zone-focused layouts
- Modular, adaptable units
- Visible organization cues and accents
Phased Renovations: Timelines, Milestones, and Contingencies
Phased renovations require a clear roadmap that links design intent to measurable milestones, budgets, and risk controls. You establish a master schedule with defined phases: assessment, design, permitting, construction, and finish.
Each phase includes concrete deliverables, owner decisions, and budget guardrails to prevent scope creep. You identify dependencies, such as structural checks before partition wiring, and set contingency cushions for unforeseen conditions, like moisture or acoustics adjustments.
Baseline timelines help you synchronize trades, maintain airflow, and preserve basement acoustics without compromising comfort. You track progress with milestone reviews and risk-adjusted schedules, rebalancing resources as needed.
You prioritize aesthetic lighting and functional layouts within each phase, ensuring costs align with value. Contingencies cover delays, material shortages, and inspection holds, keeping you on course toward a cohesive, livable space.
DIY vs. Pro: Knowing When to Hire Experts
Deciding whether to DIY or hire pros hinges on risk, complexity, and your design goals. You assess structural, electrical, and moisture considerations, then weigh time, cost, and warranty implications. A measured approach helps protect basement acoustics and mold prevention, two critical design anchors in a living space.
When in doubt, consulting licensed trades saves rework and guarantees code compliance, especially for sump, ventilation, and egress. If you’re confident in carpentry, framing, and finish carpentry, you can tackle low-risk tasks; otherwise, bring in specialists to maintain long-term durability.
Clear contracts define scope, milestones, and inspection checkpoints, reducing ambiguity. Prioritize soundproofing, proper vapor barriers, and proper drainage to sustain comfort and energy efficiency.
- Assess risk and capabilities before starting
- Define scope, timelines, and warranties
- Verify licensed expertise for critical systems
Final Prep: Inspections, Finishing Touches, and Maintenance
Final prep for inspections, finishing touches, and ongoing maintenance demands a disciplined, design-minded approach: you’ll verify that all systems meet code, complete aesthetic detailing with consistent grain and trim, and set up long-term upkeep that preserves comfort and durability.
You’ll methodically audit electrical, plumbing, and HVAC after installation, documenting compliance while noting any minor fixes, sealant seams, and moisture barriers.
For finishing touches, you’ll select decorative accents that harmonize with the room’s material palette and guarantee furniture placement promotes flow and usability.
Develop a maintenance plan detailing seasonal checks, filter schedules, and resealing needs to protect finishes.
Prioritize durability and ease of care, and document warranties.
This disciplined process yields a cohesive, low‑maintenance cellar living space with lasting value.
Frequently Asked Questions
How Long Does a Basement Conversion Typically Take?
Basement conversions typically take 4–12 weeks, depending on scope and permits. You’ll plan layout, upgrade insulation, and install ventilation systems, ensuring moisture control. You’ll need precise schedules for electrical, plumbing, and finishes, balancing design detail with practical timelines.
What Hidden Costs Might Appear During Renovation?
Hidden costs might surprise you, like a hidden layer under plaster. You’ll need precise cost estimation and careful planning to cover permits, moisture proofing, and ventilation, plus potential hidden expenses from structural updates and utility rerouting. Stay vigilant.
Can I Live in a Basement During Remodeling?
Yes, you can live in a basement during remodeling, but prioritize safety and comfort: guarantee Basement insulation, install proper Ventilation systems, avoid moisture buildup, and plan temporary living zones with sealed access, power, and reliable egress for continuous, controlled temperatures.
Which Trades Are Legally Required for Permits?
Yes, you must check with local authorities; permits hinge on trades with licensed status. You’ll align with zoning regulations and building codes, ensuring structural, electrical, plumbing, and HVAC work complies before issuance. Audits verify compliance, minimizing future liabilities.
How Do I Retrofit Existing Foundations Safely?
Retrofitting safely starts with a foundation inspection, because 60% of basement failures involve drainage or cracks. You’ll assess cracks, then apply waterproofing methods, structural reinforcement, and precise waterproof membranes to minimize settlement and moisture risks.
Conclusion
You’ve mapped moisture, ventilation, and code-knowing into a concrete plan, tightening every detail from membranes to lighting. Yet the basement’s true character remains unfinished—a blank canvas waiting for your precise interventions and calibrated airflow. As you finalize layouts and budget, small surprises will test your resolve, offering opportunities to refine. Stay vigilant with moisture sensors, maintain fire and egress readiness, and trust your phased milestones. The last door isn’t opened by luck; it opens when you finish, then live.