Begin by defining space and flow, by setting clear zones for cooking, prep, and dining, and by ensuring seamless connections to the existing home. You’ll need a precise cost plan, a realistic timeline, and a risk assessment to guide decisions on materials, glazing, and structural work. With permits and approvals pending, you’ll want a detailed layout and contractor brief that keeps utility runs coordinated. The next step locks in your approach—and that choice will influence every subsequent detail.
Define Space and Flow for a Rear Kitchen Extension
To define space and flow for a rear kitchen extension, map how the new room will relate to adjacent areas and how people move through it. You determine functional zones: cooking, cleaning, prep, and casual dining, aligning each with access points and sightlines.
Establish clear thresholds between zones using doorways, openings, or partial walls to control sight and noise while preserving openness. Prioritize space optimization by minimizing wasted passage and maximizing appliance reach, counter length, and storage access.
Plan circulation routes that avoid bottlenecks near the sink, range, and fridge, ensuring a smooth, uninterrupted path for simultaneous tasks. Use logical alignment with existing windows and doors to capitalize on daylight and ventilation, enhancing flow without compromising safety or accessibility.
Maintain precise measurements and scalable layout references for construction coordination.
Budgeting Smart: Costs, Tradeoffs, and Value
You’ll map budgeting priorities to project milestones, balancing upfront costs with long-term value.
Expect details on cost breakdowns, tradeoffs between materials and finish levels, and how choices affect durability and maintenance.
This discussion frames the financial decisions across short-term cash flow and extended ownership, guiding you toward a clear value proposition.
Budgeting Tradeoffs And Value
Budgeting for a kitchen upgrade hinges on understanding costs, tradeoffs, and value across the project lifecycle. You evaluate upfront construction expenses, ongoing operating costs, and potential resale impact to set a reliable financial envelope.
Prioritize value over novelty by linking material choices to lifecycle performance, maintenance, and energy use. Tradeoffs arise between speed, quality, and budget; accelerated timelines may raise costs and risk defects, while premium finishes can boost durability and appeal but compress margins.
Use objective criteria to compare options, documenting assumptions and expected payback. Incorporate sustainable materials where feasible to reduce long-term costs and environmental footprint, without compromising safety or code compliance.
Plan for smart storage solutions that improve daily efficiency, offsetting initial investments through tangible workflow gains and reduced clutter.
Cost Breakdown Insights
Cost breakdowns anchor smart budgeting by translating abstract concepts into concrete line items. You map project phases to measurable costs, category by category, then assess tradeoffs without vague estimates.
Structural framing reflects material choices, labor rates, permits, and contingencies, enabling you to forecast cash flow and timing with confidence. For a rear extension, you’ll prioritize essential inputs: foundations, framing, windows, insulation, and finishes, pairing them with installation schedules to minimize disruption.
Creative lighting and storage solutions must be treated as design drivers, not afterthoughts, to optimize space usage and energy efficiency. You benchmark installed costs against mid-range standards, then test sensitivity to price swings and lead times.
Documentation includes itemized receipts, warranties, and change orders, preserving value while guarding against scope creep.
Long-Term Financial Considerations
How will you balance upfront investment with long-term value when extending a kitchen? You’ll assess total project cost against expected gains in usability, energy efficiency, and resale impact.
Financial planning centers on scalable budgeting: distinguish sunk, variable, and fixed costs; forecast contingencies; and set milestone reviews.
You’ll quantify tradeoffs between premium fixtures, layout changes, and structural work, assigning clear value to each option.
Use investment strategies to compare internal rate of return, payback period, and depreciation benefits for tax purposes.
Consider operating costs post-extension—lighting, insulation, appliances—and include them in the model.
Align financing with liquidity and risk tolerance, mapping scenarios from base to conservative.
Document assumptions, revise with bids, and maintain traceable financial records to support decision making.
Permits, Timeline, and Approvals: A Clear Path
Securing permits, establishing a realistic timeline, and obtaining approvals are essential steps that set the legal, logistical, and quality standards for your kitchen extension. You’ll identify applicable codes, submit drawings, and confirm structural implications with authorities.
Timeline creation anchors milestones: design finalization, permit issuance, and contractor mobilization.
Build a documentation checklist: site plans, energy calculations, and material lists.
Design inspiration guides selection criteria but stays within code-compliant boundaries, guaranteeing feasibility prior to procurement.
Material selection becomes an evaluation of durability, fire safety, and installation methods, aligned with permits and inspections.
Ensure coordination between the local planning office and building department to avoid delays.
Maintain a change-control log for revisions.
Final approvals validate compliance, safe operation, and long-term performance of your rear extension.
Layout Planning: Zones, Circulation, and Interaction
You’ll align zones and circulation to match your cooking, prep, and dining tasks, ensuring each area supports the next with minimal steps.
Consider how traffic flows between workstations, storage, and seating to minimize backtracking and interruptions in routine.
We’ll examine interaction with space—how users engage with counters, appliances, and storage to optimize efficiency and safety.
Zones and Flow
- Establish core zones (prep, cooking, cleanup) with direct, obstruction-free access.
- Sequence tasks to reduce backtracking and optimize appliance placement for peak performance.
- Maintain aesthetic cohesion with consistent materials, color, and lighting to reinforce design flexibility.
Applied rigor yields predictable behavior: counter climbs align with sink drainage, drawers introduce ergonomic reach, and sightlines sustain safety.
In your rear extension, plan zones to support variable family use while preserving functional integrity.
This approach delivers precise, repeatable workflows and cohesive, adaptable spaces that respond to evolving needs.
Interaction With Space
How the space guides interaction defines the success of your layout. You map circulation paths to minimize conflict between prep, cooking, and cleaning zones, ensuring fluid progressions.
Define interaction zones that emphasize proximity: prep near storage, cooking adjacent to ventilation, cleanup beside water and waste. Establish sightlines that reduce need for backtracking, maintaining accessibility for appliances and work surfaces.
Use linear timber or cabinet runs to reinforce clear lines of movement, and place islands or peninsulas to segment tasks without obstructing flow.
Quantify throughput: door swings, drawer reach distances, and clearance around islands. Prioritize permeable, step-free routes to outside spaces and dining areas.
Space optimization hinges on predictable sequences, while interaction zones anchor behavior, reducing time wasted and enhancing ergonomic performance.
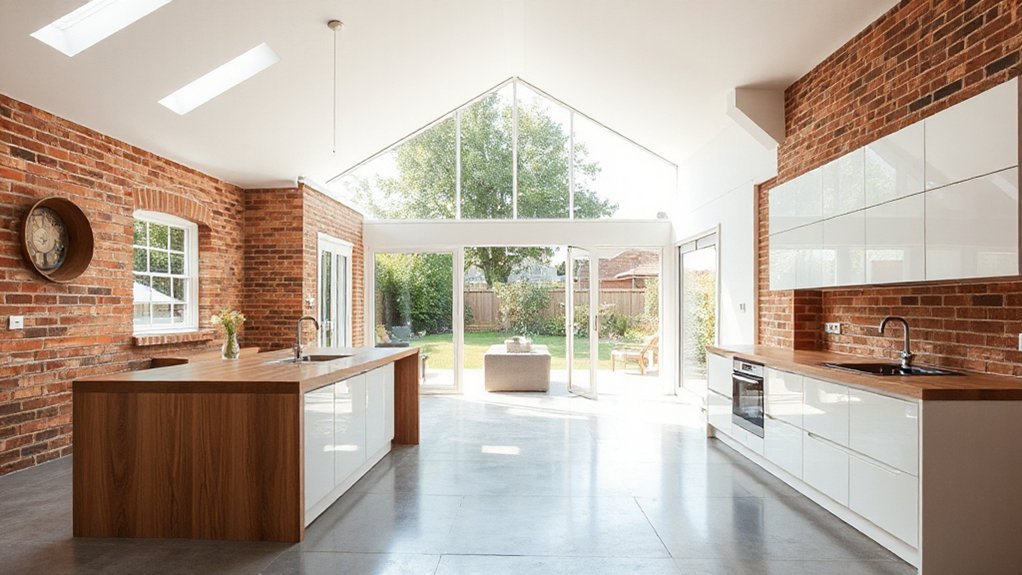
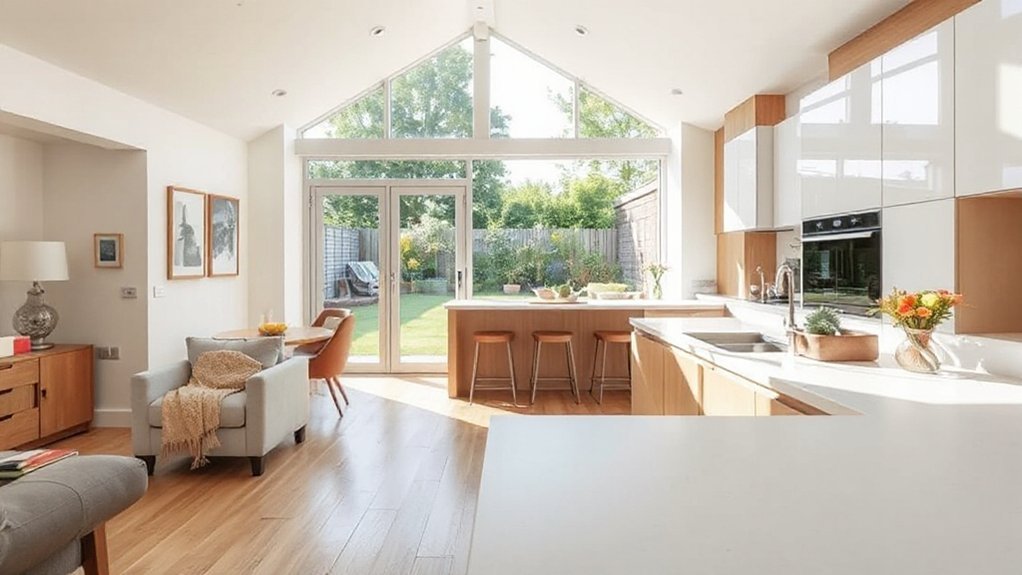
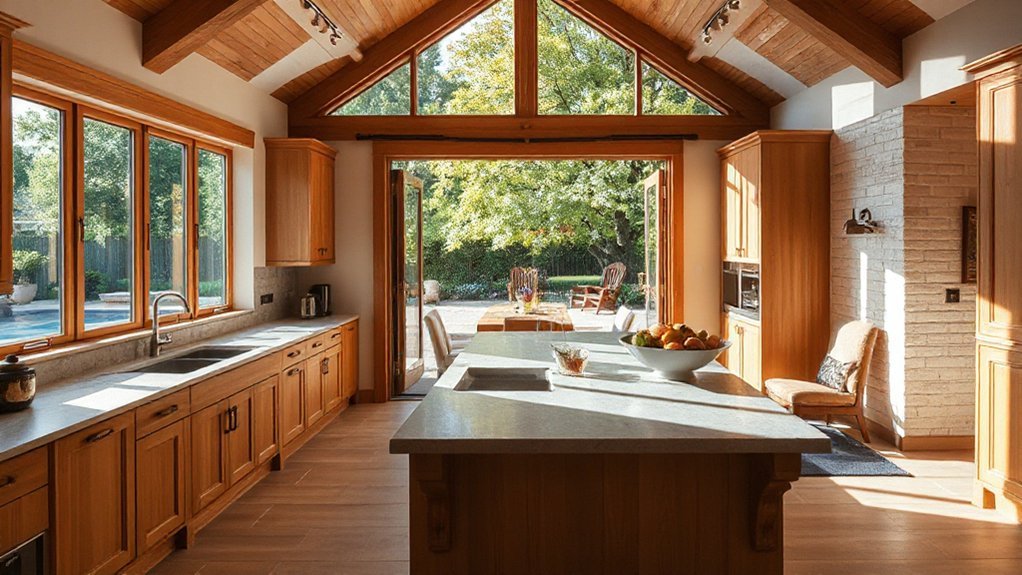
Light and Glazing: Windows, Roofs, and Brightness
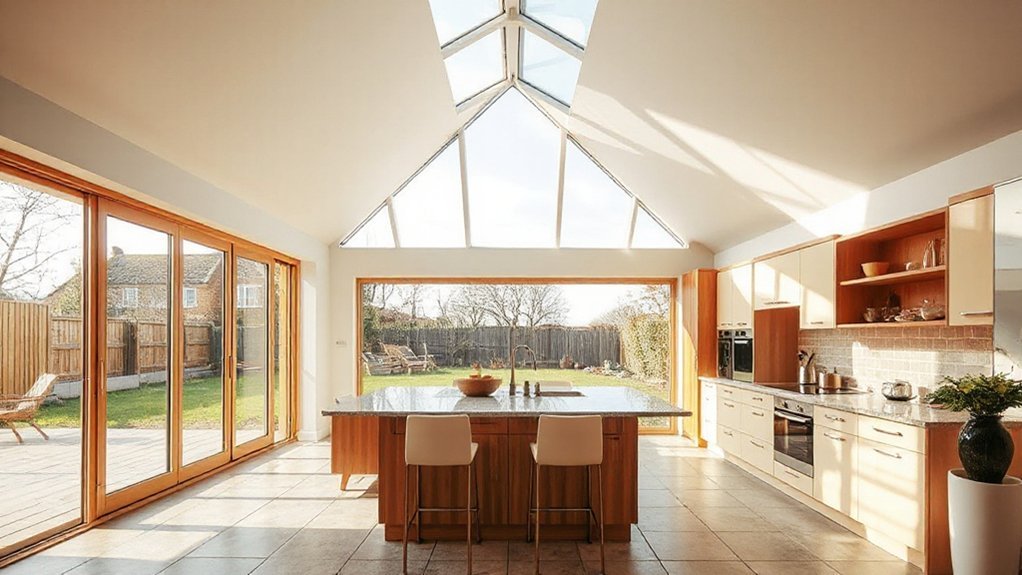
Glass and daylight shape kitchen function. You’ll optimize light by aligning glazing with workflow, minimizing glare, and maintaining thermal balance.
1) Natural light optimization: position large, unfussy panes to brighten work zones while preserving privacy and energy efficiency.
2) Window placement logic: locate high-use windows to aid ventilation, pair with roof light strategies, and reduce artificial lighting needs at key times.
3) Roof and glazing integration: combine skylights or lantern roofs with clerestory elements to distribute brightness evenly, avoid overheating, and support seasonal shading.
Materials That Weather Well and Look Great
You’ll prioritize durable exterior finishes that resist weathering and maintain a clean, modern look.
Choose low-maintenance, weather-resistant materials that perform in variable conditions without frequent upkeep.
This discussion centers on durability, low maintenance, and how finishes age gracefully across exterior surfaces.
Durable Exterior Finishes
What durable exterior finishes best withstand the elements while preserving a kitchen’s exterior aesthetic? The answer lies in durable, breathable, and low-maintenance systems that resist moisture, temperature swings, and UV exposure. Choose coatings designed for exterior use and compatible with your substrate to prevent cracking and peeling. Prioritize long-term performance, ease of maintenance, and service life, not just initial appearance.
- Exterior paint with high acrylic content and UV stabilizers for color retention
- Weatherproof coatings that form a flexible, vapor-permeable barrier
- Low-sheen finishes that resist dirt accumulation and ease cleaning
For best results, confirm substrate compatibility, proper surface prep, and curing conditions. Regular inspections, minor touch-ups, and seasonal cleaning preserve the finish and protect the kitchen envelope.
Low-Muss, Weather-Resistant Materials
When selecting low-maintenance, weather-resistant materials, prioritize those that endure moisture, temperature shifts, and UV exposure while maintaining a cohesive exterior aesthetic. You’ll want weatherproof materials that resist warping, corrosion, and fading, with proven performance in typical rear-extension environments.
Choose low maintenance finishes that simplify upkeep while preserving color and texture. Prioritize substrates and claddings rated for exterior exposure, with reinforced joints and sealed interfaces to minimize infiltration.
Opt for coatings with UV stabilizers and mildew resistance, ensuring long-term surface integrity. Ensure fasteners and trims are corrosion-resistant and color-matched to reduce maintenance cycles.
Favor modular, easily replaceable components to simplify repairs. Verify warranties, installation tolerances, and drainage details, aligning with structural safety and architectural coherence.
Utilities: Plumbing, Electrical, and Heating Layouts
Careful planning of plumbing, electrical, and heating layouts is essential to a successful kitchen extension. You’ll map routes early, minimize trenching, and align services with fixed fixtures to reduce future disruption. Prioritize scalable layouts that accommodate appliances and future upgrades, while maintaining system efficiency and code compliance. Consider sustainable materials and aesthetic choices to streamline finishes around services without compromising performance.
- Position supply and waste lines to minimize bends, maintain slope, and simplify access for maintenance.
- Route circuits with dedicated breakers for major appliances, and centralize panels to reduce cable runs.
- Locate heat sources and radiators or underfloor mats to balance comfort, minimize heat loss, and support radiant zoning.
Coordinate insulation, leak testing, and access panels now to avoid retrofits later.
Kitchen Layouts That Work: Island, Nook, and Zoning
An effective kitchen layout blends an island, a nook, and zoning to optimize workflow, comfort, and storage. You design around three core modes: central prep, informal dining, and defined task zones.
An island provides ancillary counter space and integrated appliances, while a nook creates a secondary seating area that doesn’t disrupt circulation.
Zoning separates cooking, cleaning, and refrigeration from social zones, reducing cross-traffic and heat exposure.
For storage, prioritize creative storage solutions: deep drawers for pots, pull-out shelves for dry goods, and lid organizers near the range.
Appliance integration should be deliberate, concealing bulky units behind paneling or aligning with cabinetry lines to maintain a cohesive look.
Lighting and electrical layouts must support task and ambiance without clutter.
This approach yields efficient, comfortable, and scalable layouts.
Doors and Indoor-Outdoor Living: Access and Atmosphere
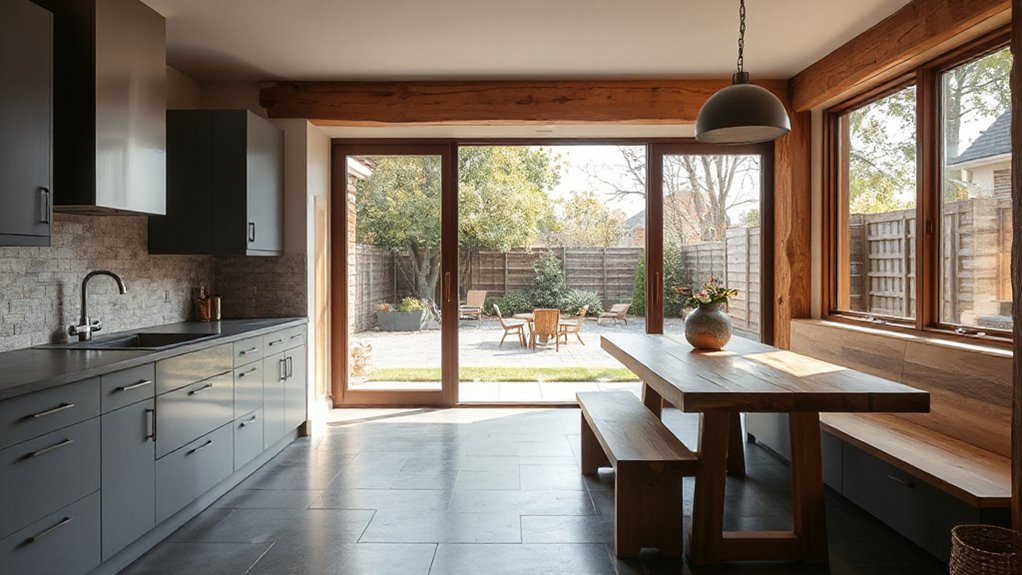
Doors and indoor-outdoor living sit at the intersection of access, airflow, and atmosphere. You’ll optimize passage between kitchen and exterior spaces with purpose-built doors, thresholds, and weatherstripping to control drafts and sound.
Prioritize performance specs and siting to maximize natural light, thermal comfort, and outdoor integration, while preserving privacy considerations.
1) Choose door types with airtight seals and durable hardware, balancing stackability and security.
2) Align operable panels with traffic flow, choreography of meals, and exterior zones for seamless movement.
3) Integrate shading and landscape borders to modulate privacy and glare without obstructing views.
Control joints, sill heights, and frame materials affect future maintenance and energy efficiency. Maintain clear sightlines, guarantee proper drainage, and document product ratings for long-term reliability.
Working With Builders: Vetting, Quoting, Managing
Working with builders begins with rigorous vetting to guarantee credentials, references, and project scope align with your kitchen extension goals. You verify licenses, insurance, and trade registrations, then cross-check past projects for quality, timeliness, and cost control.
Create a concise RFP outlining design intent, materials, milestones, and change-order procedures. When evaluating quotes, compare line-item costs, contingency allowances, and warranty terms rather than total price alone.
Ask for detailed schedules, risk assessments, and site access plans to minimize disruption. During management, establish a single point of contact and a formal communication cadence.
Require Creative lighting and Sustainable materials specifications in the contract, with accepted performance criteria. Monitor progress against milestones, document variances, and approve variations only with written justification and revised timelines.
Conclude with a post-completion review to verify quality and residual obligations.
Quick Pre-Start Checklist: Final Plan Review
So, before you break ground, run a final plan review to make certain scope, budgets, and schedules align with the approved design. You’ll verify that core elements and interfaces match, that load paths are compatible, and that permit conditions are satisfied. Confirm procurement timelines, subcontractor commitments, and site logistics remain feasible under the current schedule. Guarantee quality signals are defined for both decorative accents and craftsmanship details, preventing later rework.
- Confirm scope and interfaces align with drawings, specs, and codes.
- Validate budgets, contingency usage, and critical-path milestones against the approved plan.
- Lock in sequence, access, and inspection requirements, documenting all decision points.
What to Expect Next: From Plan to Build

Now that the plan is set, you’ll shift from design verification to actual construction execution by confirming final procurement, scheduling, and site logistics align with the approved plan. You’ll validate material deliveries, supplier lead times, and subcontractor commitments against baselined milestones, then establish contingency buffers for critical path activities.
Documented methods for waste management, site safety, and access control become operational, not aspirational. Coordination with utilities, permits, and inspections ensures compliance before work begins.
On-site sequencing—demolition, structural enhancements, enclosure, and systems integration—follows a clear takt, minimizing conflicts and downtime.
Creative storage concepts are implemented, with defined locations for cabinets, pantry modules, and hidden compartments. Color schemes are locked to performance benchmarks, ensuring schedule adherence and predictable handover without value loss.
Verify final warranties, maintenance plans, and as-built documentation.
Frequently Asked Questions
How Long Does a Rear Kitchen Extension Typically Take?
Typically, a rear kitchen extension takes 6–12 weeks, depending on design complexity and approvals. You’ll address Design considerations and Budget planning upfront, coordinate trades precisely, and monitor site logistics to minimize delays and guarantee a predictable schedule.
Can a Rear Extension Affect Home Insurance or Warranties?
Yes, a rear extension can affect insurance and warranties. You’ll need to report changes, update coverage, and check structural warranties. Insurance implications and warranty considerations should be reviewed to guarantee proper protection and compliance. Irony: predictable risk, proactive clarity.
What Is the Best Season to Start Construction?
You should start construction in dry, temperate months, typically spring or early autumn, to minimize weather delays. Plan interior decor and exterior landscaping details now, coordinating sequencing with structure, insulation, and drainage for ideal site conditions and long-term stability.
How Can I Maintain Pantry and Storage Efficiency Afterward?
Maintain pantry and storage efficiency by implementing tight-sealed containers, standardized shelving, and labeled zones. Use vertical dividers, pull-out drawers, and modular Storage solutions; regularly audit and rotate items, implement FIFO, and track usage to minimize waste.
Are Energy Upgrades Required With a Rear Extension?
Energy efficiency often requires insulation upgrades; yes, you’ll typically need higher performance insulation. You’ll secure savings, streamline systems, and guarantee ventilation. You pursue energy efficiency and insulation upgrades, preserving comfort while optimizing layout, structure, and energy consumption without overhauling existing metrics.
Conclusion
As you finalize the plan, the last few decisions will quietly determine the extension’s fate. You’ve mapped the zones, forecasted costs, and lined up builders, but the key tension lingers: will the light, airflow, and flow actually align with your daily life? Stay disciplined with specs and inspections, because one overlooked detail can derail progress. When the first wall rises, you’ll feel the hinge between dream and reality tighten—your kitchen’s future, waiting to prove itself. Stay vigilant.