Imagine turning an unused attic into a functional, value-adding space with smart access and climate control. You’ll weigh feasibility, permits, and budget while planning lighting, headroom, and layouts that balance comfort with style. From daylight through skylights to durable finishes, every decision should support future use—home office, guest room, or studio. Curious how to align these factors into a coherent roadmap that still leaves room for design breakthroughs? Keep reading.
Is Your Loft Feasible? Feasibility Checklist
Before you begin, assess the three core feasibility pillars: structure, access, and overhead. You’re evaluating load paths, ridge integrity, and rafters for ongoing capacity.
Inspect existing loft insulation to judge thermal performance and potential retrofit needs; poor insulation can undermine comfort and energy targets.
Verify access routes, hatch size, and ceiling height to guarantee safe movement and equipment installation.
Assess overhead constraints, including floor loading, joist spacing, and any hidden services that might constrain conversion.
Determine structural support requirements with a professional, outlining where reinforcements are feasible and cost-effective.
Consider future utility routes, ventilation, and moisture control as part of the plan.
Document findings clearly to guide design decisions, prioritizing safety, efficiency, and long-term performance.
Loft Conversions and Regulations: Permits You Need
You’ll start by outlining the permits you’ll need, from planning approvals to building regulations, so you know the exact scope of compliance.
I’ll present the framework for permits required, along with typical fees and processing timelines, to keep your project on track.
We’ll frame next steps around ensuring you meet compliance milestones efficiently, so your loft conversion proceeds with clear, enforceable standards.
Permits Required Overview
Permits are a non-negotiable foundation of any loft conversion, ensuring structural integrity, fire safety, and compliance with local codes. You’ll verify scope with your planning authority, identify required drawings, and confirm permitted alterations before breaking ground.
The process hinges on accurate documentation: floor plans, elevations, and structural calculations that demonstrate load paths, joist spacing, and roof shear resilience. Expect timing to hinge on whether you modify egress, insulation, or electrical layouts, each needing inspection checkpoints.
You’ll coordinate with your inspector to align construction stages with approval milestones, minimizing rework. As you design, plan for practical outcomes: budget-controlled utilities, accessible storage, and daylighting that respects neighboring envelopes.
Decorative accents and color schemes should be storyboarded for future aesthetic refreshes, not retrofitted post-completion.
Compliance and Fees Details
Compliance requirements form the backbone of a loft conversion project, aligning design ambitions with regulatory thresholds and cost realities. You’ll navigate the legal framework by identifying applicable building regulations, fire safety standards, and structural considerations before drafting plans.
Legal compliance means you review ventilation, insulation, escape routes, and ceiling heights to guarantee future usability and safety. You’ll determine required paperwork early, avoiding delays during inspection windows.
Permit fees are a predictable cost, with variances based on scope, location, and authority. Prepare a concise submission package that includes structural notes, party-wall notifications if needed, and proposed materials.
You’ll engage professionals for accurate drawings and risk assessments, then monitor timeline milestones to align approvals with construction phases, minimizing rework and ensuring a compliant, value-adding outcome.
Budgeting a Loft Conversion: Cost by Phase
Understanding the phase-by-phase cost breakdown lets you forecast capital needs and cash flow with precision.
You’ll map each stage—planning, structural work, services, finishes—against benchmarks to tighten budgeting and flag overruns early.
This phased view drives disciplined decision-making and clear cost control across the project.
Phase Cost Breakdown
- Early design and approvals: fees, surveys, and permit costs
- Structural analysis and framing: load calculations, lumber, fasteners
- Mechanical, electrical, and plumbing: risers, permits, and testing
- Insulation, drywall, and finishes: vapor barriers, taping, textures
- Final inspections and carpentry: trim, hardware, and compliance checks
Budgeting By Stage
Budgeting a loft conversion by stage clarifies expected cash flow by project phase, from initial approvals through final finishes. You map costs against milestones, ensuring liquidity for design, permits, structure, and services before funds are released.
Begin with Budget planning for site surveys, architect fees, and conformity checks, then forecast permutations of materials and labor to prevent overruns. As decisions drive scope, keep a rolling ledger that absorbs changes without derailing progress.
Align procurement windows with construction sequencing, so orders arrive when needed, not in advance. Track contingency allocations you’ll actually use, not merely reserve.
Let Design inspiration fuel cost-control decisions—specify products, finishes, and methods that satisfy vision while reducing waste. You’ll achieve predictable timelines, transparent reporting, and improved stakeholder confidence through disciplined, phased budgeting.
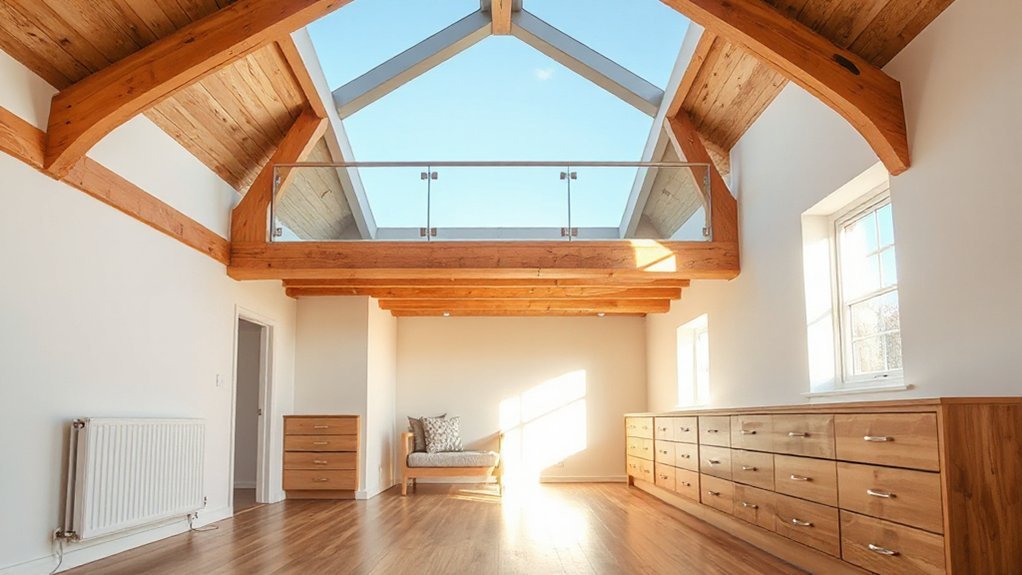
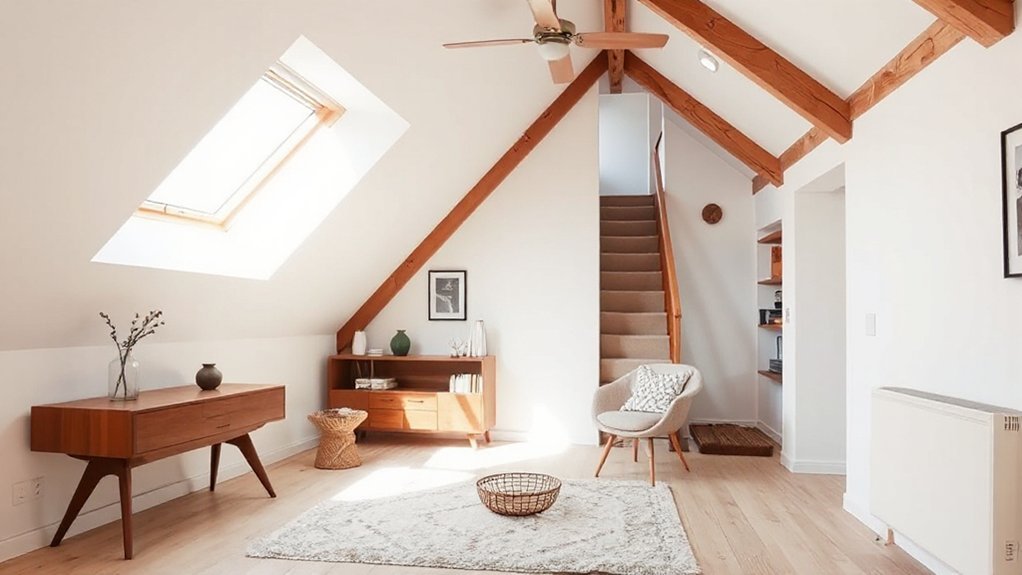
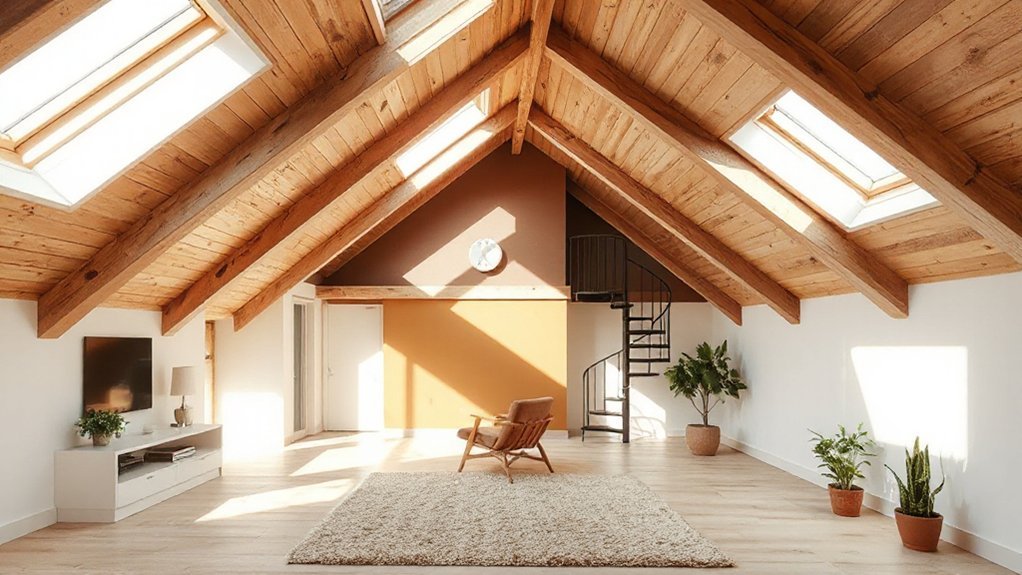
Lighting a Loft: Skylights, Dormers, and Glass
Skylights, dormers, and glass walls transform a loft’s lighting by inviting natural daylight deeper into the space while shaping the mood and energy use. You evaluate orientation, glazing type, and shading to maximize lighting design and avoid glare.
Precision placement controls heat gain, guarantees even distribution, and preserves privacy. You balance daylight with artificial layers to maintain color accuracy and ambience, stabilizing natural illumination across seasons.
Implement high-performance seals and thermal breaks to maximize efficiency. Consider operable skylights for ventilation, and skylight shafts for diffusion. Sustainable framing reduces weight stress and permits future renovations.
- Maximize orientation and glazing for consistent natural illumination
- Use operable skylights for ventilation without compromising insulation
- Employ diffusers and glazing to minimize glare
- Integrate shading to control sun angles year-round
- Prioritize airtight seals and thermal breaks for energy efficiency
Headroom and Layout: Designing Comfortable Loft Rooms
Designing comfortable loft rooms starts with ensuring headroom and layout deliver unobstructed movement and flexible use. You’ll map vertical clearance to purpose, reserving knee and shoulder room for each zone, so circulation isn’t compromised by furniture or fixtures.
Prioritize a practical layout: clear corridor paths, low-profile storage, and adaptable zones that can morph with needs. Establish roofline-aware zones where head height informs fixture choices, avoiding awkward installations under eaves.
Implement skylight or dormer placements that maximize daylight without intrusion, ensuring glare control and privacy.
Plan interior decor and color schemes to enhance perceived space—lighter tones on ceilings, cooler neutrals on walls, with purposeful accents. Use consistent sightlines, modular furniture, and hidden connections to maintain a cohesive, scalable loft environment.
Master Plan: From Master Suite to Home Office
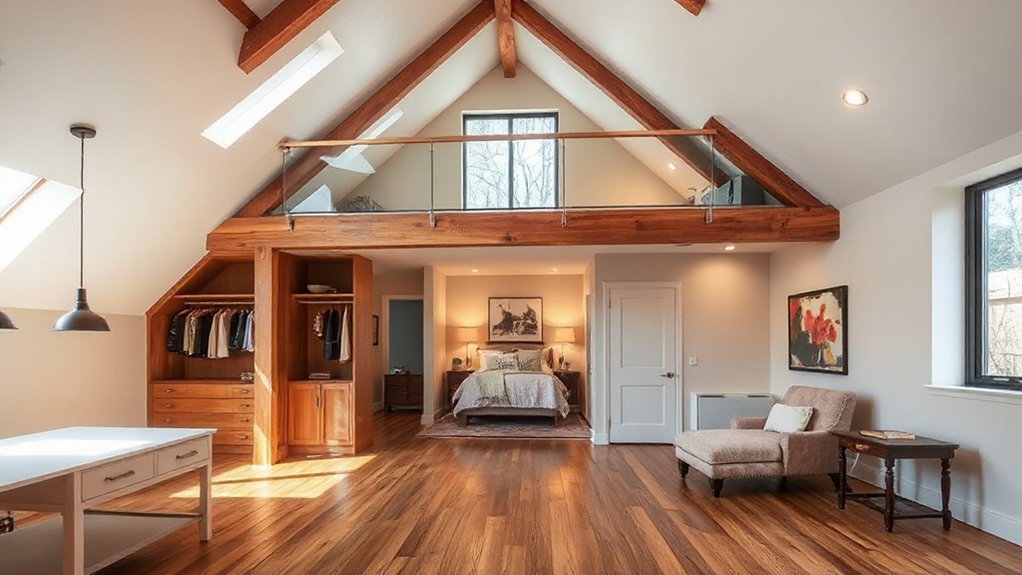
From the master loft plan, you’ll consolidate the headroom-optimized zones into a flexible master suite that can morph into a high-function home office by day. You design a responsive envelope: sound-dampened HVAC, modular write-surface pods, and storage that recedes when not in use.
The conversion hinges on calibrated metrics: daylight capture, ceiling-transition details, and load-bearing precision to preserve flow. Decorative accents define zones without clutter, while color palettes establish psychology and focus.
You implement a switchable privacy system and ergonomic workstation heights to sustain productivity. Aligned with structural efficiency, every element supports hybrid use, from morning drafting to evening calls.
The plan remains adaptable, future-proof, and scalable as needs evolve.
- Zoned morphing master suite
- Hidden storage with tactile cues
- Acoustic optimization by design
- Dispatchable lighting scenes
- Decorative accents and color palettes synergy
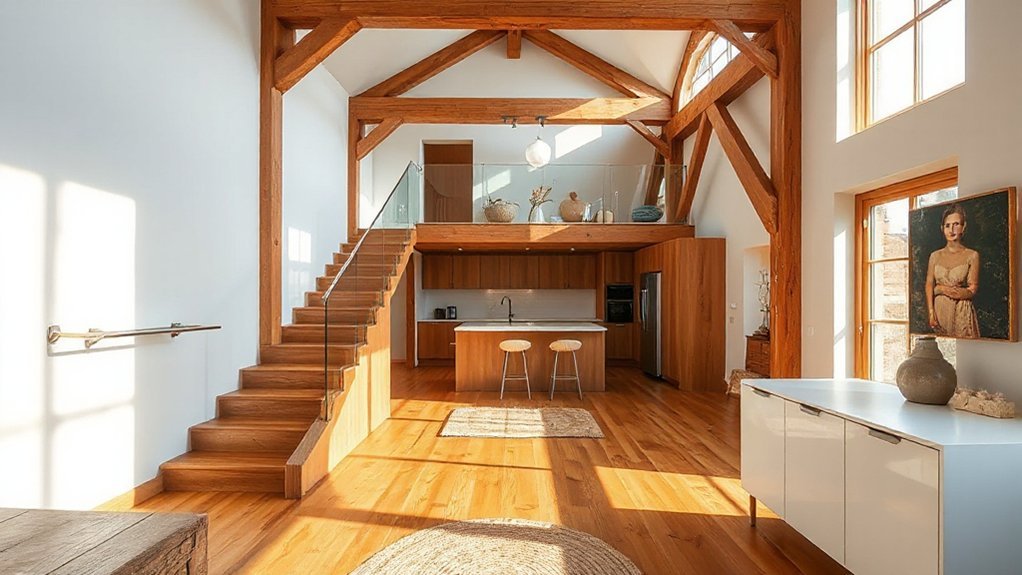
Staircases for Loft Living: Space-Saving Access Ideas
You’ll evaluate compact stair layouts that maximize height while minimizing footprint, so every rise supports safe but efficient ascent.
We’ll examine hidden space-saving solutions that tuck treads, rails, or storage into the stair envelope without compromising accessibility.
This approach sets a precise, visionary standard for loft access that integrates structural efficiency with aesthetic clarity.
Compact Stair Layouts
Ever considered how compact stair layouts can unlock loft usability without sacrificing safety or headroom? In a space-efficient design, you optimize run length, tread width, and landing placement to maximize usable area while preserving clearance. Precision planning minimizes wasted dead zones and guarantees compliant riser heights, rail grip, and handrail continuity.
You’ll balance ascent comfort with storage opportunities under stairs and along sidewalls, selecting stringer profiles that reduce visual bulk without compromising strength. Thoughtful geometry yields repeatable fabrication, simpler connections, and faster installation.
Prioritize access practicality for daily routines, mid‑story conversion, and bulky item moves, all while preserving safety margins. The result is a scalable, durable framework for loft living.
- Optimized tread spacing for comfort and code compliance
- Compact stair geometry with adjustable risers
- Integrated storage opportunities beneath the stringer
- Slim-profile stringers for visual lightness
- Clearances maintained at landings and doors
Hidden Space-Saving Solutions
Hidden space under stairs isn’t wasted—it’s a design asset you can deploy with surgical precision. You’ll treat stair access as a framework for storage, seating, or discreet circulation, aligning geometry with your loft’s flow.
Choose a vertical cadence: shallow shelves for display, deeper bays for bins, and pull-out drawers near landings to minimize reach. Integrated lighting guides movement and preserves floorspace, while wall-mounted cabinets avoid bulk.
Consider concealed hinges and soft-close mechanisms to maintain a clean aesthetic. Decorative accents should echo the loft’s material language, balancing tactile warmth with industrial clarity.
For color schemes, contrast neutral bases with bold accent hues to delineate zones without visual clutter. Precision planning guarantees staircases become both utility and focal point, elevating space efficiency and perceived value.
Insulation and Energy Efficiency for Lofts
Insulation and energy efficiency are foundational to a loft conversion, because proper thermal barriers reduce heat loss, cut running costs, and enable consistent comfort year-round.
- Prioritize high-performance thermal insulation with low U-values to minimize conduction pathways.
- Seal air leaks at junctions, penetrations, and eaves to prevent drafts and moisture ingress.
- Specify reflective or radiant barriers for hot climates to curtail solar gains.
- Use airtight enclosures around loft access and services to maintain consistent warmth.
- Integrate energy-saving strategies with efficient windows, vents, and controls for measurable energy savings.
Sound and Privacy in Loft Spaces
How can you guarantee sound隔 within a loft conversion while preserving privacy and comfort? You start with a sound isolation strategy that targets impact and airborne noise separately.
Implement robust floor assemblies: decoupled joists, resilient channels, and dense underlay to reduce footfall vibrations.
Upgrade walls with staggered studs, mass-loaded vinyl, and plasterboard pairs to minimize flanking sound.
For airborne noise, seal joints with acoustic sealant and ensure airtight door thresholds.
Integrate soundproofing techniques into ceiling treatments using acoustic tiles or gypsum boards with resilient layers.
Privacy remains paramount through strategic layout, visual barriers, and compliant glazing.
Employ privacy screens where line-of-sight access is unavoidable, and align them with ventilation and light planning to maintain comfort without compromising acoustic performance.
Ventilation and Climate Control in Attics
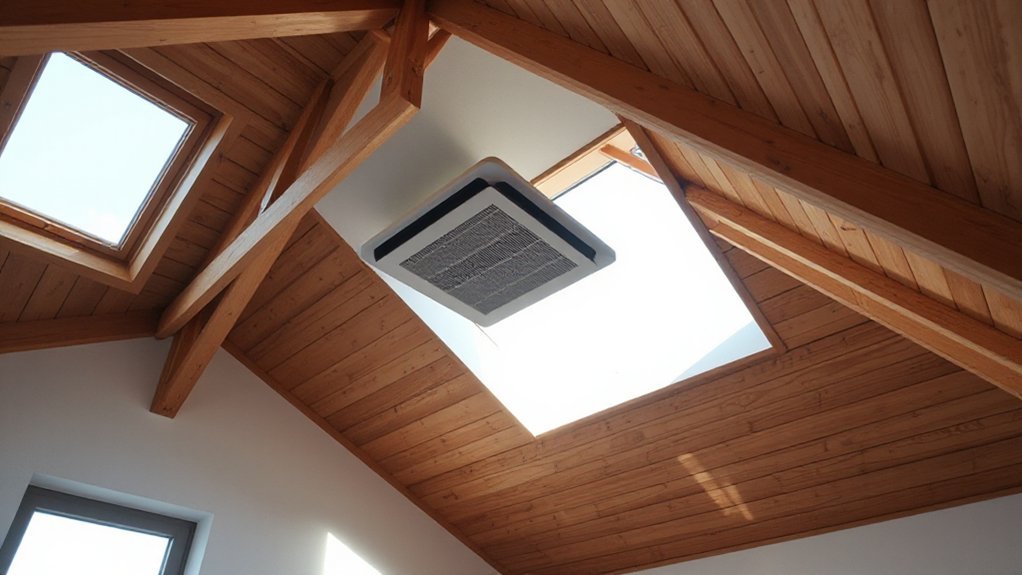
In this section, you’ll examine attic ventilation basics, how to select climate control strategies, and practical moisture management tips to protect structural integrity.
You’ll assess airflow, drainage, and insulation interfaces to optimize energy efficiency and comfort.
Attic Ventilation Basics
Do you know how proper attic ventilation shapes energy efficiency and indoor comfort? When you design the airflow, you prevent moisture buildup, regulate temperatures, and protect insulation performance.
Effective roof ventilation works with intake vents to create a continuous path for air exchange, reducing heat gain in summer and frost risk in winter. Pair this with thoughtful attic insulation to minimize thermal bridges and keep conditioned space stable.
Precision in vent sizing, placement, and sequencing determines long-term comfort and energy use. Understanding moisture dynamics helps you avoid condensation, mold, and material degradation.
The goal is a balanced, scalable system that supports future upgrades without reworking existing structure.
- Key roles of roof ventilation in climate control
- Compatibility with attic insulation strategies
- Ideal vent placement for uniform air flow
- Maintenance routines that sustain performance
- Indicators of ventilation effectiveness
Climate Control Strategies
Integrated climate control in attic design hinges on coordinated ventilation and insulation strategies that work as a single system. You implement continuous ventilation paths, balanced intake and exhaust, and radiant barrier layers to minimize heat transfer.
Prioritize airtight construction paired with high-performance insulation, so conditioned air remains stable and unintended exchanges are suppressed.
In summer, deploy operable vents, staggered soffit intake, and ridge or turbine exhaust to exhaust heat efficiently while preserving occluded insulation.
In winter, reduce heat loss through careful sealing and controlled ventilation, preventing condensation without starving air exchange.
Integrate climate adaptation principles to respond to climate variability, and tailor energy conservation targets to your roof geometry and occupancy patterns.
This approach yields durable comfort, reduced utility loads, and sustainable loft value.
Moisture Management Tips
Moisture management in attic spaces hinges on balanced airflow and climate-aware controls that prevent condensation while maintaining comfort. You’ll optimize ventilation design with continuous soffit and ridge intake, minimizing pockets where humidity concentrates, and pair it with smart vents that respond to dew point changes.
Employ moisture barriers at decking and eaves to prevent intrusion from the living space, and guarantee airtight seams around penetrations to avoid vapor leakage.
Implement humidity control through measured dehumidification and vapor diffusion balancing, calibrated to seasonal loads. Monitor with a compact sensor network to alert on rising RH before issues materialize.
- Install continuous soffit-to-ridge ventilation with controllable exhaust
- Use moisture barriers at all roof penetrations and seams
- Seal electrical and plumbing gaps to curb vapor intrusion
- Integrate humidity control sensors linked to automatic vents
- Regularly test insulation, air sealing, and condensate drainage
Storage Solutions: Built-Ins and Hidden Compartments
Storage solutions in a loft demand precision and clever use of space: built-ins maximize usable volume by integrating seating, shelving, and cabinetry into the room’s architectural lines, while hidden compartments preserve clean, uncluttered surfaces.
You’ll design modular units that align with ceiling slopes and wall planes, ensuring load paths are predictable and removable panels simplify maintenance.
Built-ins should offer adjustable shelves, shallow pull-outs for cables, and integrated power for tech stations.
Hidden compartments must maintain continuity of material and finish, with discreet access doors that avoid visual breaks.
In practice, pair storage with decorative lighting to illuminate deep recesses without glare, and coordinate with color schemes to reinforce perceived depth.
The result: efficient, scalable storage that feels central, not ancillary.
Exterior Upgrades for Loft Conversions: Roof, Eaves, and Access
Upgrading the exterior of a loft conversion starts where interior storage design ends: with the roof, eaves, and access points that define how your space breathes and functions. You’ll optimize airflow, daylight, and accessibility while preserving structural integrity and curb appeal.
Focus on form-driven decisions that enhance exterior aesthetics and performance, aligning with your overall design language. Choose roofing materials that balance durability, weight, and thermal resistance. Then plan eave overhangs to control wetness and shade.
Access elements—ladders, dormers, staircases—must blend safety with minimal visual intrusion.
- Align roofline with existing architecture for cohesive exterior aesthetics
- Select roofing materials for weight, durability, and weather resistance
- Design eaves to improve drainage and shading without bulk
- Integrate discreet access points for safety and comfort
- Consider skylights or dormers to maximize daylight and space perception
Materials and Finishes: Natural Wood vs Modern Surfaces
When choosing materials and finishes for a loft conversion, natural wood and modern surfaces offer distinct performance and aesthetic profiles that influence light, texture, and acoustics.
You’ll balance warmth, durability, and environmental impact by weighing grain, tannins, and finish coats against engineered composites, laminates, and solid-surface panels.
Natural wood delivers tonal depth and acoustic damping, while modern surfaces provide uniform reflection, low maintenance, and rapid installation.
Consider joinery, panel sizing, and edge detail to avoid visual noise at elevated angles.
For decorative accents, align wood species with hardware styles and lighting temperatures to preserve cohesion across zones.
Develop color schemes that contrast with structural elements and maximize perceived height.
Finally, map maintenance cycles, lifespan, and replacement ease to sustain long-term loft clarity and value.
Quick Wins to Add Value With a Loft Conversion
A loft conversion can add immediate value by implementing five targeted upgrades that boost usability, light, and perceived space within weeks rather than months.
- Install decorative lighting layers to sculpt ambient, task, and accent zones, maximizing height perception without structural changes.
- Optimize furniture placement to open circulation and define functional zones, reducing clutter and improving perceived area.
- Choose reflective or light-coloured finishes on ceilings and walls to amplify daylight and airiness.
- Upgrade entry points with a slim, energy-efficient staircase and loft hatch detailing for safer, faster access.
- Integrate smart controls for lighting and climate to enhance comfort, usability, and long-term energy savings.
Case Studies: Real Loft Conversions and Lessons Learned
Case studies ground loft-conversion theory in real-world outcomes, revealing how specific decisions shape usable space, daylight, and value. You’ll see how door placements, stair geometry, and peak-height decisions alter flow, storage, and perceived generosity of rooms.
In several projects, optimized eave lines preserved headroom for sleeping lofts while maintaining usable living zones below, a balance key to long-term comfort. You’ll notice that daylight strategies—skylights, dormers, and perimeter glazing—translate directly into perceived space and energy use, influencing resale appeal.
Lessons emphasize that materials and detailing matter; historical architecture constraints sometimes demand clever detailing to honor heritage while enabling modern loft aesthetics. Across cases, iterative design reviews, constraint mapping, and cost-awareness yield scalable templates for future conversions.
Next Steps: Create Your Loft Conversion Roadmap
So, where do you start when turning loft ideas into a concrete plan you can trust? You map a phased roadmap that links function to form, anchored by scope, budget, and risk. Establish baseline constraints, then align design intents with structural feasibility, utilities, and building codes.
Prioritize essential upgrades: Loft lighting and roof ventilation, then layer in daylight, insulation, and access. Create decision gates to prevent scope creep, with measurable milestones and review points. Document assumptions, owner approvals, and contractor responsibilities to maintain accountability.
Translate concepts into quantified specs, drawings, and a costed schedule. Maintain a living plan that adapts to site reality while preserving your vision for space, light, and value.
- Define scope and success criteria early
- Schedule phased milestones with owners’ approvals
- Specify Loft lighting and roof ventilation requirements
- Integrate structural, electrical, and HVAC constraints
- Track costs, risks, and change controls
Frequently Asked Questions
How Long Does a Typical Loft Conversion Take From Start to Finish?
A typical loft conversion takes about 6 to 12 weeks, depending on size and approvals. You’ll safeguard Loft insulation and maintain Roof structural integrity, coordinating permits, builders, and electricians to minimize disruption and guarantee precise, visionary outcomes.
Can a Loft Conversion Add Prospective Rental Yield?
Yes, a loft conversion can substantially boost rental potential. You’ll enhance space and functionality, improving investment return as demand rises. With precise planning, you optimize yield, targeting higher rents and longer tenancies, making your property a visionary, competitive asset.
What Is the Minimum Headroom Required for Habitable Space?
You need at least 2.0–2.2 meters of headroom for habitable space, ensuring Building regulations compliance and Structural integrity are preserved, with precise planning. You’ll justify elevations, insulation, and eave space to meet safety, comfort, and future adaptability.
Are There Grants or Tax Incentives for Loft Projects?
Are there grants or tax incentives for loft projects? Yes—government grants and tax incentives exist, and you qualify with careful planning. You pursue eligibility, apply strategically, and maximize benefits, while accounting for timelines and compliance in your loft conversion.
How Do I Choose Between a Loft Bedroom or Home Office?
You should evaluate your daily needs and long-term goals, choosing a space that fits your workflow and comfort. Consider decorating ideas and lighting options to maximize function; a home office benefits from task lighting, while a bedroom needs soft ambiance.
Conclusion
You’re not just adding space—you’re raising possibilities. A loft is a doorway to overlooked potential, a quiet anchor that steadies your home’s future with light, structure, and purpose. Let the staircase be your ascent, skylights your eyes to opportunity, and smart storage your invisible engine. As you sketch layout and budget, remember: every beam signals resilience, every finish whispers personality. In this quiet attic, aspiration becomes architecture, and value becomes habit. Your vision takes form, quietly, purposefully.