The Roofing Hammer: The Ultimate Guide
A roofing hammer is one of those tools that looks simple but rewards close attention. The differences between a good roofing hammer and a mediocre one — in head weight, face type, handle material and length, balance point, and specialist features — are real and affect both the speed and quality of roofing work every time the tool is used. Whether you are a professional roofer choosing a working tool, a self-builder fitting roof tiles for the first time, or simply trying to understand why there are 30 different roofing hammers on a builder’s merchant shelf, this guide covers everything you need to know.
What Makes a Roofing Hammer Different from a Standard Hammer?
A roofing hammer is not simply a heavy-duty claw hammer. It is a specialist tool designed for the specific demands of roofing work — driving fixings into timber battens and rafters, cutting and dressing materials including slates and lead, and operating at height in physically demanding conditions. Its design reflects these requirements in several ways that distinguish it from carpentry or general construction hammers.
The weight. Roofing hammers are typically heavier than carpentry hammers — commonly 20–24 oz (560–680g) for the head, compared to 16–20 oz for a standard claw hammer. The extra weight is appropriate for driving nails through slates, tiles, and battens in a single firm stroke, reducing the number of strikes required and the cumulative physical effort over a working day.
The face. Most roofing hammers have a milled or serrated striking face rather than the smooth face of a finishing hammer. The serrated pattern grips the nail head and prevents the hammer from glancing off during the strike — particularly important when driving a nail into a slate hole while the slate is held at an angle, or when working at an awkward reach.
The pick. The reverse end of most roofing hammer heads is a pointed pick rather than the claw found on a carpentry hammer. This pick is used to punch nail holes in slates and soft materials without a separate punch tool. Some roofing hammers have a claw rather than a pick (useful for pulling nails and removing damaged tiles) and some have a hatchet or axe blade for trimming and dressing slate — the choice depends on the primary work the hammer will be used for.
The handle. Roofing hammer handles are typically shorter than framing hammer handles — 300–380mm compared to 350–450mm for framing hammers — reflecting the working position on a roof where swing clearance is often limited and precision is more important than maximum swing force. Handle materials and their characteristics are discussed below.
Types of Roofing Hammer
Slater’s Hammer
The slater’s hammer is the traditional specialist tool for natural slate roofing. It typically features a head with a flat striking face on one side and a long, narrow pick on the other — the pick used to punch nail holes in slate rather than using a separate punch. Many slater’s hammers also have a gauge notch or measuring ridge on the head for marking consistent gauge lines on the slate, and some have a cutting or trimming edge for trimming slate to size.
The slater’s hammer is specifically optimised for natural slate work and the combination of punching, nailing, and trimming tasks that natural slate installation requires. Its pick is hardened to withstand the repeated impact required to punch through slate without deforming.
For a professional natural slate roofer, the slater’s hammer is the primary tool — it performs the nail hole punching, nailing, and trimming functions that would otherwise require multiple separate tools.
Roofing Claw Hammer
The roofing claw hammer replaces the pick with a claw — the same basic configuration as a carpentry hammer but typically heavier, with a milled face and a shorter handle sized for roofing work. The claw provides the ability to pull nails and lift tiles, which the pick does not offer, but it cannot punch nail holes.
For concrete and clay tile roofing — where tiles come pre-holed from the manufacturer — the need to punch holes is eliminated and the claw becomes the more useful reverse face. Roofing claw hammers are common among general roofers who work with both slates and tiles and want a single tool that can handle nail removal and tile lifting.
Hatchet-Style (Shingling Hatchet / Roofing Hatchet)
The shingling hatchet is the standard tool for asphalt shingle and wood shake installation in North America. It combines a flat striking face with an axe-style blade on the reverse — used for trimming shingles to length and for cutting individual shingles to fit around penetrations. Most shingling hatchets also include an adjustable exposure gauge on the side of the head, allowing the roofer to consistently space shingles at the correct exposure without measuring.
Shingling hatchets are relatively uncommon in the UK, where asphalt shingle roofing is less prevalent, but they are the most widely used roofing hammer type in the United States and Canada. Their design is specifically optimised for the speed of shingle installation — the blade, the gauge, and the milled striking face are all features that increase productivity in a system where thousands of nails are driven per working day.
Framing/Roofing Combination
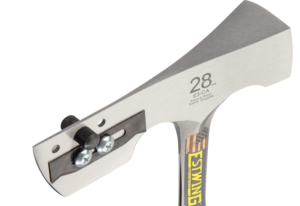
Some heavy-duty claw hammers — marketed as framing or roofing hammers — have head weights of 28–32 oz (790–910g) with longer handles for maximum nail-driving force. These are appropriate for structural roofing work — fixing ridge boards, nailing rafters, and driving large nails into structural timber — but are heavier and more tiring than specialist tile and slate hammers for finish roofing work. They are not typically the first choice for tile or slate installation.
Key Specifications and What They Mean
Head Weight
The standard range for roofing work is 16–24 oz (450–680g). The appropriate weight depends on the work being done:
- 16–18 oz: Light to medium nailing, appropriate for cedar shakes, lighter roofing work
- 20–22 oz: Standard for most tile and slate work — the most common specification for professional roofers in the UK
- 24 oz+: Heavy nailing, structural roofing timber work, or applications requiring maximum driving force
Heavier is not automatically better. A 24 oz hammer used all day for slate nailing will cause more arm and shoulder fatigue than a 20 oz tool, with no productivity advantage for the lighter nailing required. Match the weight to the work.
Face Type
Smooth face: Appropriate for finish nailing where the nail head must be set without marking the surrounding surface. Less common in roofing work, where the striking surface is typically not a finished face.
Milled / serrated face: The standard for roofing hammers. The cross-hatched pattern grips the nail head and reduces glancing, improving efficiency and reducing the risk of the hammer slipping off the nail and striking the slate or tile surface. The milled pattern gradually wears smooth with use; a well-worn milled face approaches the performance of a smooth face but is still preferable for roofing.
Waffle face: A more aggressive version of the milled face, with a pronounced raised grid pattern. Provides the best grip on nail heads but can mark timber surfaces if the hammer over-drives. Not typically required for roofing work where the nail is being driven into a batten or rafter beneath the roofing material.
Handle Material
Fibreglass handles are the most common choice for professional roofers in the current market. They are lighter than steel, absorb vibration better than solid steel handles, and are more resistant to breaking than wood under impact loads. Quality fibreglass handles are ergonomically contoured and typically include a rubber overmould grip. They do not rot, do not swell in wet weather, and are not affected by temperature extremes.
Wooden handles (hickory) remain the traditional choice and retain loyal adherents among experienced tradespeople who value the feel of wood — the way it transmits feedback from the strike and the slight flex that absorbs impact energy. Hickory is the strongest and most impact-resistant wood for handle use. Quality wooden-handled roofing hammers are still produced and preferred by many slate roofers who value the material’s characteristics. The limitation is that wood can split under extreme impact, and handles need periodic inspection and occasional replacement.
Steel handles provide the greatest durability and connection strength between head and handle but transmit vibration directly to the hand — a consideration over a long working day. Many steel-handled hammers include a rubber or foam overmould grip to mitigate this. Solid steel handles are essentially indestructible but are the heaviest option.
Anti-vibration (shock absorber) handles — proprietary systems from manufacturers including Stanley/FatMax and Estwing — incorporate internal vibration-dampening materials that measurably reduce the vibration transmitted to the hand and wrist. For roofers who drive large numbers of nails daily, this vibration reduction has real ergonomic value in reducing fatigue and the cumulative impact on joints.
Balance and Feel
The balance point of a hammer — the point at which the tool balances horizontally when held — affects how the tool feels in use and how much effort is required to swing it accurately. A hammer with its balance point closer to the head swings more heavily and drives nails with more energy; a hammer balanced closer to the handle feels lighter and is more manoeuvrable in tight spaces.
Neither balance extreme is universally better. Experienced roofers develop strong preferences for specific tools based on balance, and these preferences are real — the balance that works well for one person may not suit another. This is the primary reason that professional roofers typically try before they buy, and why a cheap replacement hammer of the same nominal specification can feel completely different from a trusted tool.
Handle Length
Roofing hammer handles are typically 300–380mm (12–15 inches). The appropriate length depends on the nature of the work — shorter handles provide more control and precision in tight working positions on a roof slope; longer handles provide more swing momentum for heavy nailing. Most UK roofers use handles at the shorter end of this range for tile and slate work.
Roofing Hammer Features: What to Look For
Pick vs. Claw
For natural slate work, a pick is the correct reverse face — the ability to punch nail holes in slate is essential and the claw is not frequently needed for this type of work. For concrete and clay tile work, where tiles are pre-holed, the claw is more useful for pulling nails and lifting damaged tiles. Many roofers who work with both materials choose their preferred face type based on their primary work and use separate tools for the other.
Gauge Notch
Some slater’s hammers include a notch or ridge on the head that can be used to mark or check the gauge spacing of slates. For professional slate roofers, this integrated gauge function reduces the need for a separate marking tool and speeds up the installation process.
Magnetic Nail Holder
Some roofing hatchets and hybrid tools include a magnetic nail holding slot that holds a nail in position for the first strike — useful when working at height where dropping nails has a cost. This feature is more common on shingling hatchets than on UK slate and tile hammers.
Caring for a Roofing Hammer
A quality roofing hammer, properly maintained, should last many years of professional use. The most important maintenance steps are:
Check the handle condition regularly. On wooden-handled hammers, inspect for cracks, splits, or looseness at the head-handle junction before each use. A cracked handle should be replaced immediately — a handle that fails under load can release the head with dangerous force. On fibreglass and steel handles, check for cracks or deformation at the head attachment point.
Keep the striking face clean. Pitch, adhesive, and roofing compound buildup on the striking face reduces grip and increases the risk of glancing. Clean the face with a wire brush or a rag dampened with appropriate solvent.
Store appropriately. Wooden-handled hammers should not be stored in conditions of extreme humidity or temperature fluctuation that will cause the wood to swell, shrink, or check. All hammers should be stored where they will not be buried under heavy materials that could damage the handle.
Replace worn handles. Hammer head quality typically outlasts handle quality by years. The replacement of a worn or damaged wooden handle — reputable replacement handles are available for most professional hammer brands — extends the working life of the head indefinitely.
Recommendations by Application
Professional natural slate roofing: A quality slater’s hammer with pick, 20–22 oz, with a milled face and a well-balanced fibreglass or hickory handle. Specific well-regarded options include the Maydos Slater’s Hammer, traditional models from Footprint Tools, and equivalent professional-grade products. Expect to pay £25–£60 for a quality professional tool.
Professional concrete and clay tile roofing: A roofing claw hammer, 20–24 oz, with milled face and fibreglass handle. The claw provides nail removal and tile lifting capability that the pick does not.
Asphalt shingle installation (North America and some UK): A shingling hatchet with built-in exposure gauge, typically from Estwing, Stanley, or Stiletto. The gauge and blade are the specific productivity advantages for high-volume shingle installation.
Self-builder or DIY roofer: A quality 20 oz roofing hammer with fibreglass handle and milled face from a reputable brand (Stanley, Faithfull, Draper at the lower end; Estwing, Stiletto, or tradesman’s brands at the higher end) covers most domestic roofing tasks. A separate slate punch (bolster or purpose-made punch) can substitute for the pick if a claw hammer is preferred.
What to Spend
Roofing hammers range from approximately £15 for budget DIY-grade products to £80–£120+ for professional-quality forged tools from premium brands. The difference is real — a better hammer is better balanced, better finished, more durable, and simply better to use. For a professional roofer using a hammer for eight hours a day, the quality investment pays back quickly in reduced fatigue and tool longevity. For an occasional DIY user, a mid-range tool at £25–£45 from a reputable brand represents good value without the premium of a professional-grade product.
The most important thing is to buy from a reputable manufacturer rather than an unbranded product at the lowest price point — the head-to-handle connection and the hardness of the strike face are the quality elements that distinguish a tool that will perform for years from one that will fail or disappoint within months of regular use.